There’s a unique feature to DirectScale that provides a rich, curated experience for your Associates, and that is Multi-Faceted Configuration (MFC). MFC is a set of parameters that allow you to control who can see, or has access to, specific page elements in an Associate’s Web Office site. Elements like a banner, navigation link, or widget.
For example, You can set up a banner to show only on Memorial Day to users of a certain status, living in the US, who speak Spanish. Or, you can create a custom page that only shows to users of a certain rank. Additionally, you can apply logic to target specific data points. MFC gives you control over your content.
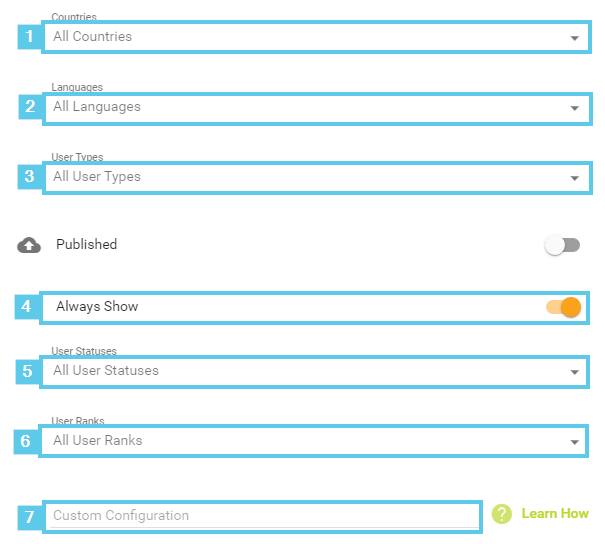
The multi-facets, in this case, are the fields that makeup MFC:
-
Countries - Visible to Associates located in all countries or only to selected countries.
-
Languages - Visible to Associates for all languages or only to selected languages.
-
User Types - Visible to Associates for all Associate Types or only to selected Types.
-
User Statuses - Visible to all Associates or only to those of selected statuses. Common Associate statuses include Active or Inactive.
-
User Ranks - Visible to Associates for all ranks or only to selected ranks.
Note: The rank settings are based on the highest rank. If you want to use the current rank instead, this would be a great use of custom configurations.
-
Always Show - Set a specific time frame for when the page element is visible. Toggled on by default, the element will be visible once published. When toggled off, this setting contains two options:
- Start Date - Set the date, time, and time zone. Click the ADD START DATE button to reveal the options.
- End Date - Set the date, time, and time zone. Click the ADD END DATE button to reveal the options.
You can set both a start date and end date, a start date with no end date, and an end date with no start date (visible once published and expires on the end date), giving you flexibility with timed promotional items and elements. Examples could include event registration, limited-time products, or sales.
-
Custom Configuration - Using DirectScale’s custom query language, you can show or hide elements based on specific Associate data.
Example: “I only want this resource to be displayed to users in the United States who enrolled within the last (rolling) 30 days.”
%20in%20Web%20Office%20Admin%20Tutorial%20(360038994133)_mceclip1%20-%201%20-%202.png)
Read more: Custom Configurations
MFC parameters are located within an element’s configuration (for example, you’ll see them while adding a navigation link.).
You may also notice the Show For column on many pages:
%20in%20Web%20Office%20Admin%20Tutorial%20(360038994133)_mceclip1%20-%201.png)
This column displays the selected MFC configurations for a page element.
Comments
Please sign in to leave a comment.