With the Web Office Placement Suite, a logged-in Associate can:
-
See who is available to place.
-
Search for an upline Associate to see if they are available to have placement under them.
-
Place the Associate in the upline Associate’s Unilevel Tree.
Read more in Moving an Associate with the Web Office Placement Suite.
| The Placement Suite is for Unilevil compensation plans. For Binary, use the Holding Tank. |
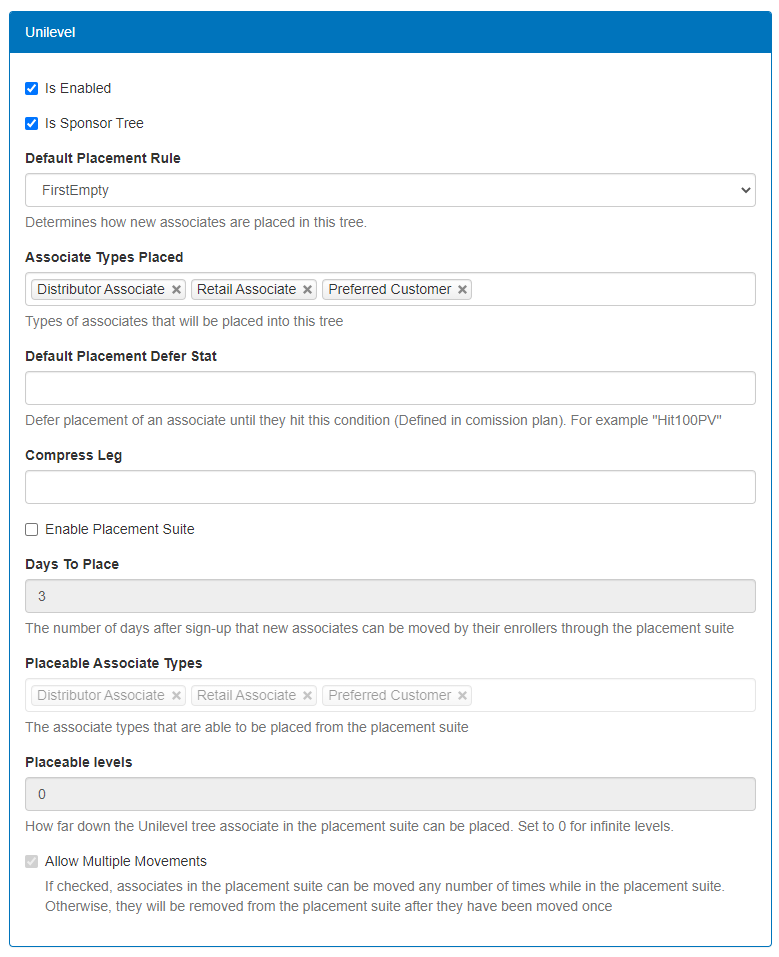
Enabling the Placement Suite
Admin: Corporate Admin
Page: Settings > Advanced Settings > Configure Trees
URL: [CLIENTID].corpadmin.directscale.com/Settings/TreeConfiguration
Permission: ViewAdministration(), ViewAdvancedSettings()
Before your Associates can use this feature, you must enable the Placement Suite and configure your Tree settings in Corporate Admin:
-
In Corporate Admin, navigate to the Configure Trees page.
-
Locate the Unilevel section.
-
Select the Enable Placement Suite checkbox.
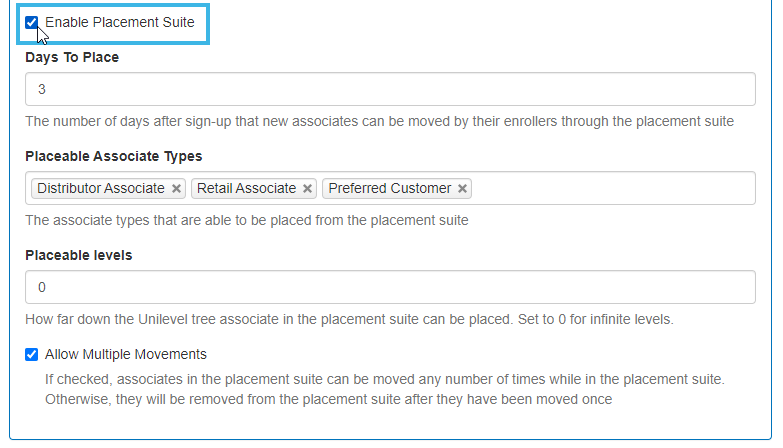
The rest of the settings are now available to set:
-
Days To Place - Enter The number of days after sign-up that enrollers have to move new Associates through the Placement Suite.
-
Placeable Associate Types - Select which Associate Types will appear on the Placement Suite page for placement.
-
Placeable levels - Enter how far down the Unilevel Tree in the Placement Suite enrollers can place Associates. Set to 0 for infinite levels.
-
Allow Multiple Movements - If selected, enrollers can move Associates any number of times in the Placement Suite. Otherwise, the system will remove them after being moved once.
-
-
Complete the preceding settings to your specifications.
-
Click Save Changes.
Changing the Placement Suite’s Default Instructions
Admin: Web Office Admin
Page: Content Management > Localization
URL: [CLIENTID].admin.directscale.com/#/Localization
Permission: Strings
After you have configured these settings to your preference, change the Placement Suite page’s default instructions to include the details of your configured rules.

To change the text:
-
In Web Office Admin, navigate to Content Management > Localization.
-
Search for the
all_new_personalString Key. This is for the brief text description at the top before the "Show More" button. -
Click SAVE.
-
Search for the
placementsuit_textString Key. This is for the additional information or longer description of placement suite rules that is shown after clicking on the "Show More" button. -
Click SAVE.
Comments
Please sign in to leave a comment.