The PayQuicker Platform is secure, compliant, FDIC insured, and provides customized solutions with automated payment processing to over 170 countries. Flexible spending options include co-branded prepaid debit cards, local bank deposits, cross-border payments, and spend-back.
For money-out (commission payments), PayQuicker can function as an E-Wallet where the available funds come from earned commission payouts. You can also set PayQuicker up as a payment processor (money-in) merchant to charge for orders.
Basic E-Wallet Payment Process
When an Associate receives commission payments, the system funds their E-Wallet. The funds are available to purchase more of your products.
-
The Associate selects their inventory items and begins the checkout process.
-
The Associate selects "PayQuicker" as the payment provider and clicks the Checkout button.
PayQuicker displays the Associate’s available balance here as well. A balance of "-1" means the Associate’s account is not yet set up. The Associate should contact you to resolve this issue. -
The order processing system retrieves the balance from the Associate’s account to verify funds and then sends the request to charge.
-
PayQuicker processes the request and sends back confirmation of acceptance (or denial if there are insufficient funds).
Before You Start
-
For testing on PayQuicker’s side, reach out to your account manager and gain credentials to a production site. On the DirectScale side, if you have a Stage environment, you can create test orders and commission payments there before setting up on Live.
-
You must "whitelist" your DirectScale Live and Stage IP addresses with PayQuicker. Contact Customer Care for assistance.
-
Acquire the necessary credentials and information (provided by PayQuicker when your account is created.):
-
IdP Url
-
API Client ID
-
API Client Secret
-
Funding Account Public ID
-
Adding Credentials in DirectScale
Admin: Corporate Admin
Page: Settings > Advanced Settings > Merchants
URL: [CLIENTID].corpadmin.directscale[ENVIRONMENT].com/Settings?category=Merchants
Permission: ViewAdministration(), ViewAdvancedSettings()
| For testing purposes, add credentials to your Stage environment first (if available). |
-
Scroll down until you find your PayQuicker’s form (or Ctrl F "payquicker").
-
Enter the provided credentials in the form.
Required fields:
-
Funding Account Public ID - Provided by PayQuicker.
-
API Client ID - Provided by PayQuicker.
-
API Client Secret - Provided by PayQuicker.
-
IdP URL - Provided by PayQuicker.
-
Is Live - When disabled, the merchant is in simulated transaction mode that allows you to test payments on your Stage environment. When you’re ready to start using PayQuicker to accept/payout real money, enable this setting on your Live environment.
All integrated payment merchants must have Is Live enabled on Live to function. Optional fields:
-
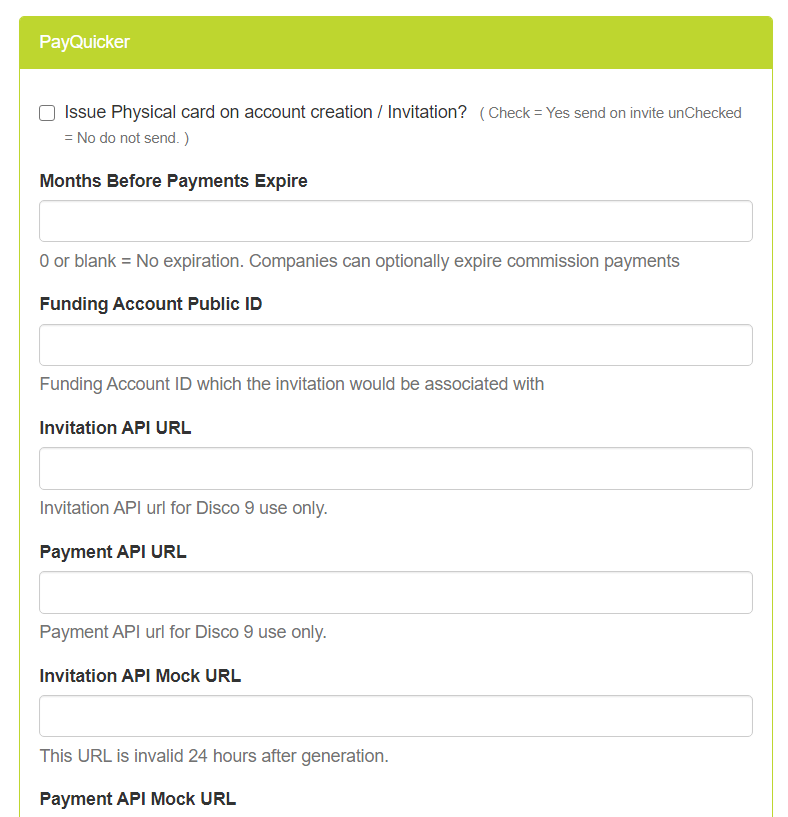
Issue Physical card on account creation / Invitation? - Enable this setting to send the Associate a physical card once their account is provisioned.
-
Months Before Payments Expire - You can optionally set the number of months that must elapse for payments to expire. Enter "0" or leave blank for no expiration.
-
Backup Merchant ID - You can optionally integrate with a second merchant provider for backup. The backup merchant’s purpose is to cover the difference if an Associate doesn’t have enough E-Wallet credit to complete a purchase.
Deprecated fields:
-
Invitation API URL
-
Payment API URL
-
Invitation API Mock URL
-
Payment API Mock URL
-
Base API URL
-
-
Click the Save Changes button.
Setting up PayQuicker as a Commissions Merchant
Admin: Corporate Admin
Page: Settings > Advanced Settings > Commission
URL: [CLIENTID].corpadmin.directscale.com/Settings?category=Commission
Permission: ViewAdministration(), ViewAdvancedSettings()
If you plan to use PayQuicker as your commissions payout merchant, you must enter the Merchant ID in Corporate Admin.
| For testing purposes, add credentials to your Stage environment first (if available). |
On Settings > Advanced Settings > Commission:
-
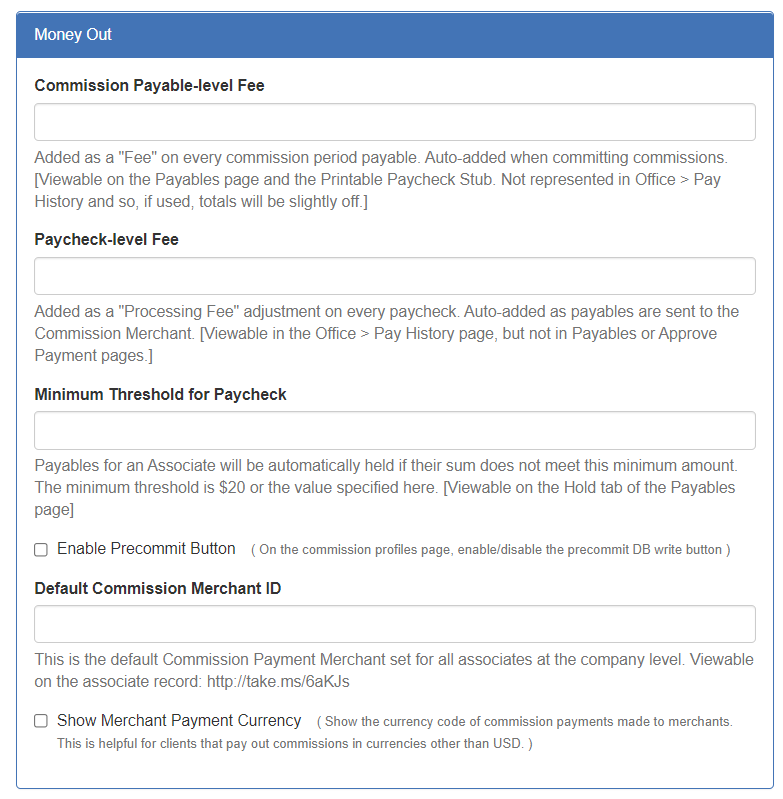
Locate the Money Out section.
-
In the Default Commission Merchant ID field, enter
113, PayQuicker’s Merchant ID. -
Click the Save Changes button.
Additional Settings
-
For additional commission merchant settings, see Integrating with a Commission Merchant Provider.
-
For restricting PayQuicker to specific regions or Associate Types, see Mapping Commission Merchants
Comments
Please sign in to leave a comment.