Admin: Web Office Admin
Page: Content Management > Testimonials
URL: [CLIENTID].admin.directscale.com/#/Testimonials
Permission: Testimonials
You can collect testimonials, or Associates can submit them through the Web Office. The Testimonials page, in Web Office Admin, allows you to highlight positive reviews or Associate success stories to encourage other Associates. Associates will be able to view and share the testimonials with public outlets.
Adding a Testimonial
-
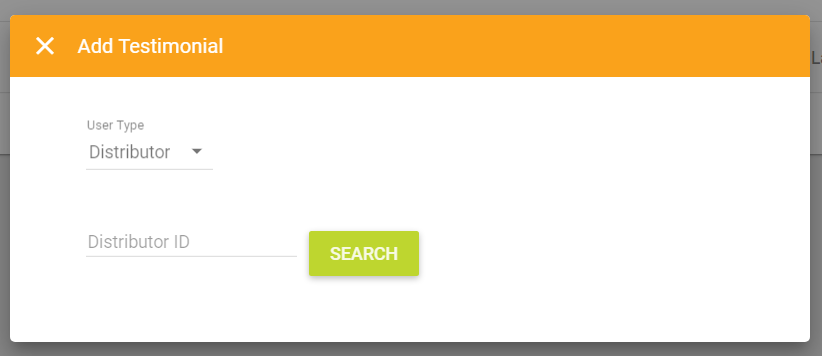
Click the ADD TESTIMONIAL button.
The Add Testimonial pop-up window opens.
-
Click the User Type dropdown and make a selection.
-
If Distributor - The name will be hyperlinked to the Associate’s profile so that an Associate can view them for more information.
-
If Customer - The name will not link to a profile.
The rest of the fields will reveal, and the Distributor ID will disappear.
-
-
If Distributor, in the Distributor ID text field, type the Associate’s ID.

You can find the Distributor/Associate ID on the Associate’s Detail page, or by querying the CRM_Distributors table.
-
Click the SEARCH button. The pop-up window will expand, and the Associate’s name will autofill into the Name field.
-
If Customer, enter the customer Name.
Uploading an Image
-
Under the Preview Image section, click the CLICK TO SELECT IMAGE area to upload an image.
Important: The image must be JPG/PNG, square (at least 200 x 200), and less than 50 MB to upload.
This image will display as a profile thumbnail. Typical images include a picture of the featured product or Associate. Not required, but highly recommended.
-
Alternatively, under the Image section, click the dropdown and select Enter Image URL. Type the URL to the image file. Use this when an image is hosted in a cloud-based app or your own CMS with a public URL. Use the complete URL including the protocol (
https://). For example,https://www.directscale.com/images/customerTestimonialImage.png/).
Entering Testimonial Detail
-
In the Occupation text field, type the customer’s/Associate’s occupation.
-
In the Favorite Product (tags) text field, type any relevant tags related to the customer’s/Associate’s favorite product.
Separate each tag with a comma (,) or press Enter on your keyboard after each tag.
-
In the Testimonial Focus (tags) field, type any relevant tags related to the Associate’s testimonial. Keywords are useful for finding testimonials that refer to the same products or experiences.
Separate each tag with a comma (,) or press Enter on your keyboard after each tag.
-
In the My Story (Testimonial) TinyMCE Editor, type the provided testimonial. Keep in mind that Associates can view testimonials on mobile devices. Be conscious about the content sizes (videos, images, etc.).
Saving the Testimonial
-
Click the Published toggle to publish the testimonial now after saving the configuration.
-
The rest of the settings Multi-Faceted Configuration (MFC).
Enter your specific configurations on who can view the testimonial.
-
When finished, click SAVE.
Important: You must add tags to both Favorite Product and Testimonial Focus fields for the SAVE button to appear.
Using Testimonials in the Web Office
Site: Web Office
Page: Tools > Testimonials
URL: [CLIENTID].office.directscale.com/app.html#/Testimonials
Viewing and Sharing Testimonials
Associates can VIEW and SHARE the testimonial. When an Associate clicks SHARE, an options menu reveals:
-
Copy Link - This allows you to paste the direct link to the Share Site in any other social app.
The Share Site allows Associates to distribute company testimonials and give customers easy access to an Associate’s contact information and eCommerce Shop. Additionally, you can edit the background image displayed in the Branding page in Web Office Admin.
-
Send to Email - Opens a preferred email tool and adds the message.
-
Share on… - Create a new post on the selected social media site where Associates can add an entry to the post.
-
SEND TO TEAM - Share the resource through the Web Office’s internal messaging feature.
Submitting a Testimonial
Associates can also submit a testimonial by clicking the Submit a Testimonial button and following the instructions shown in the pop-up.

You can overwrite the default instructions of submitting the Testimonial in the Localization page in Web Office Admin.
On the Localization page, search for the following string key and edit the Text Value.
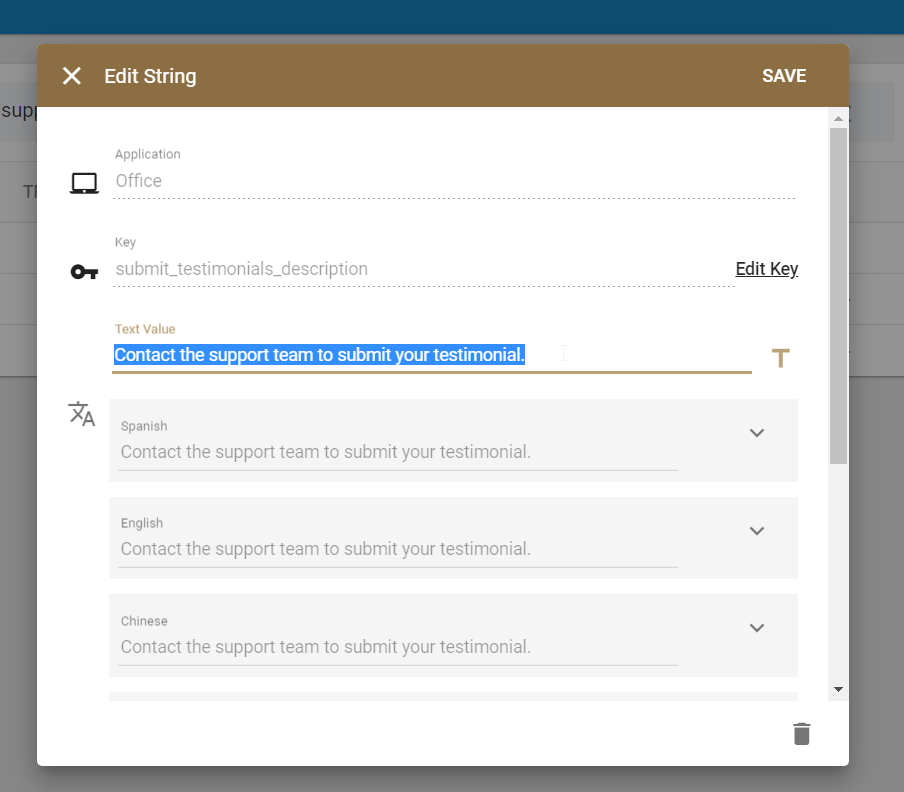
String key: submit_testimonials_description
The instructions will display in the Submit a Testimonial pop-up once the cache is recycled; this can take up to 30 minutes.
Comments
Please sign in to leave a comment.