You can configure the following Web Office widgets to account for your new market’s cultural values and regulations:
-
Marketing Sites
-
Orders/Autoships
-
Personal Information
-
Rank Information
-
Sponsor/Enroller
Marketing Sites
Admin: Web Office Admin
Page: Advanced Settings > Widgets
URL: [CLIENTID].admin.directscale.com/#/WidgetsSetup
Permission: Setup Widgets
-
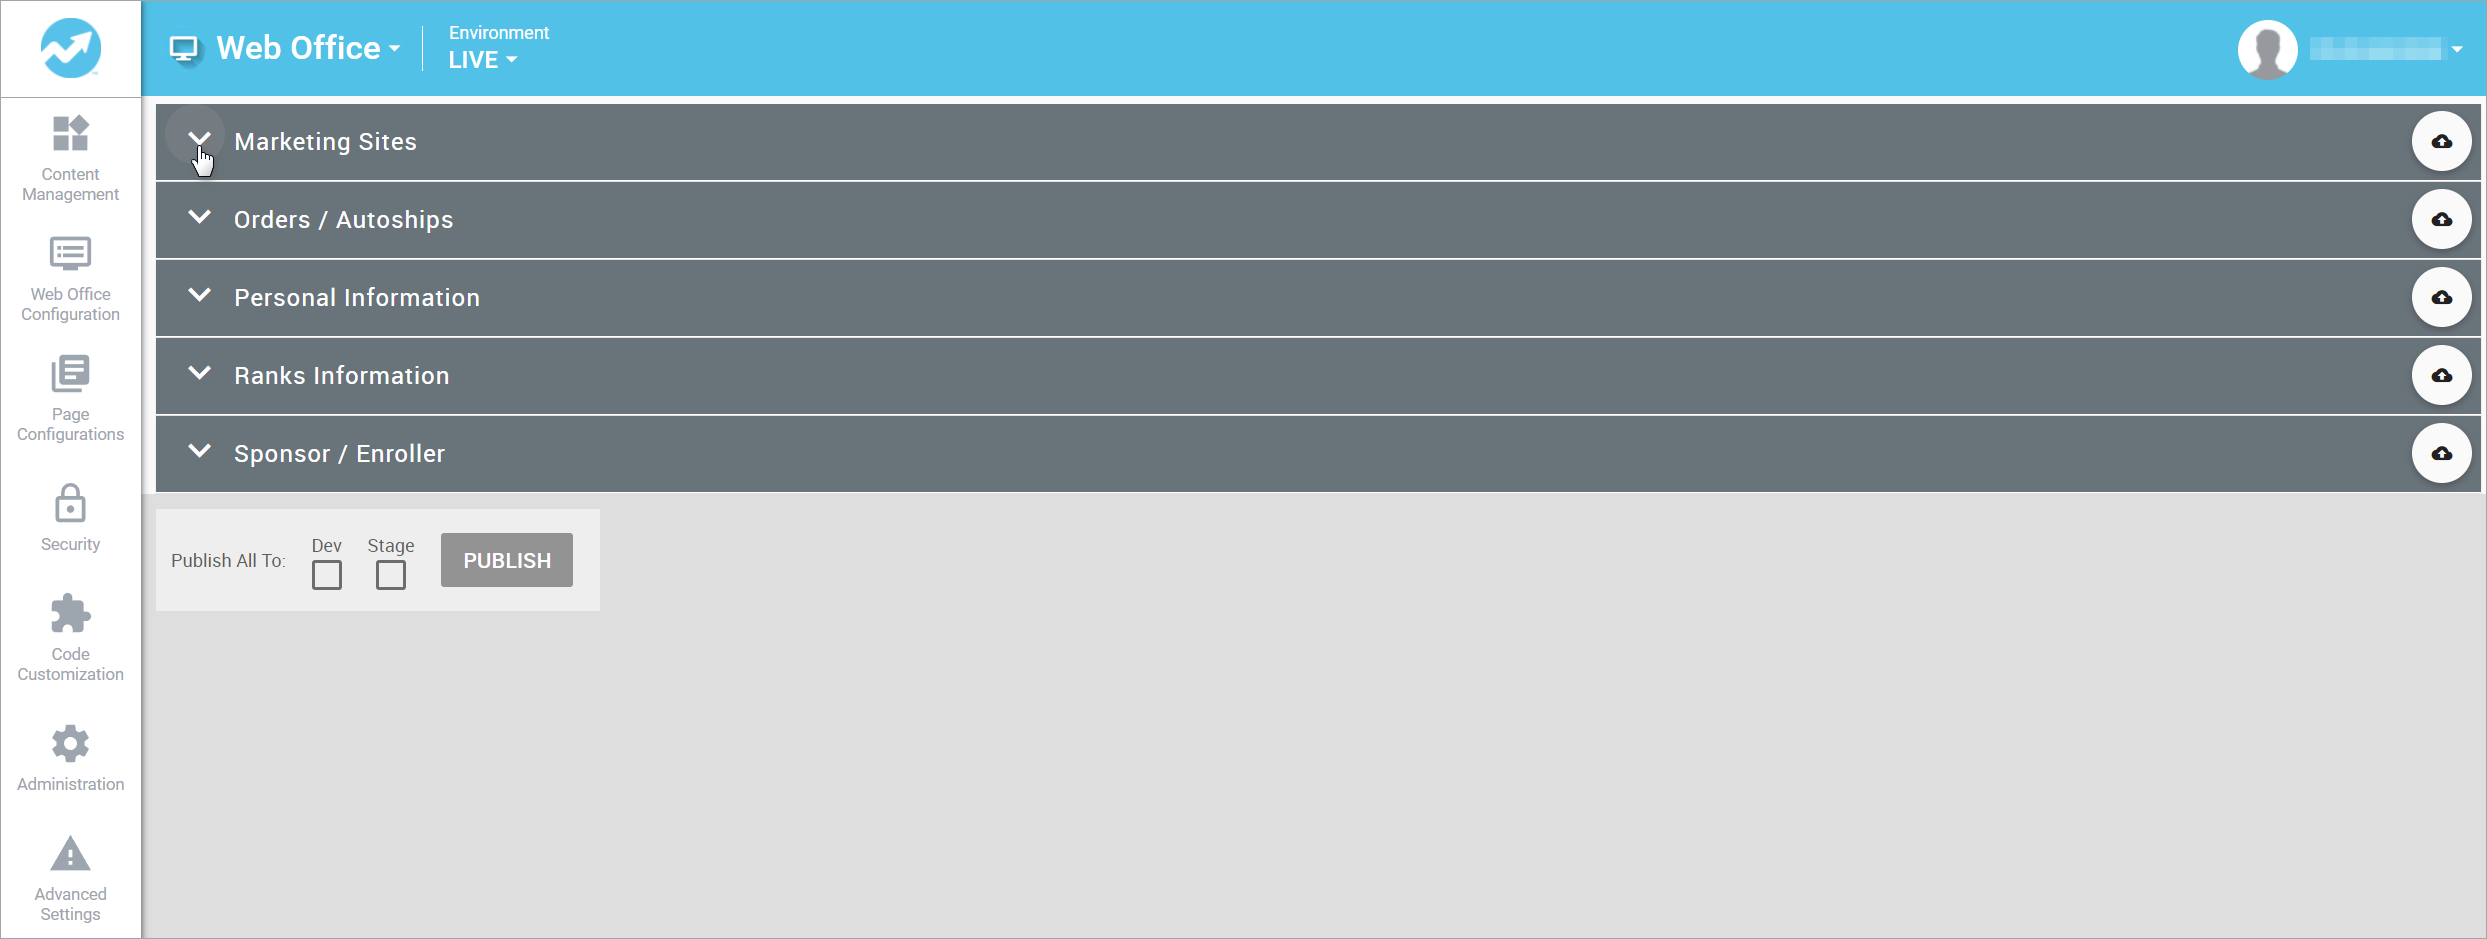
Expand the Marketing Sites section.
-
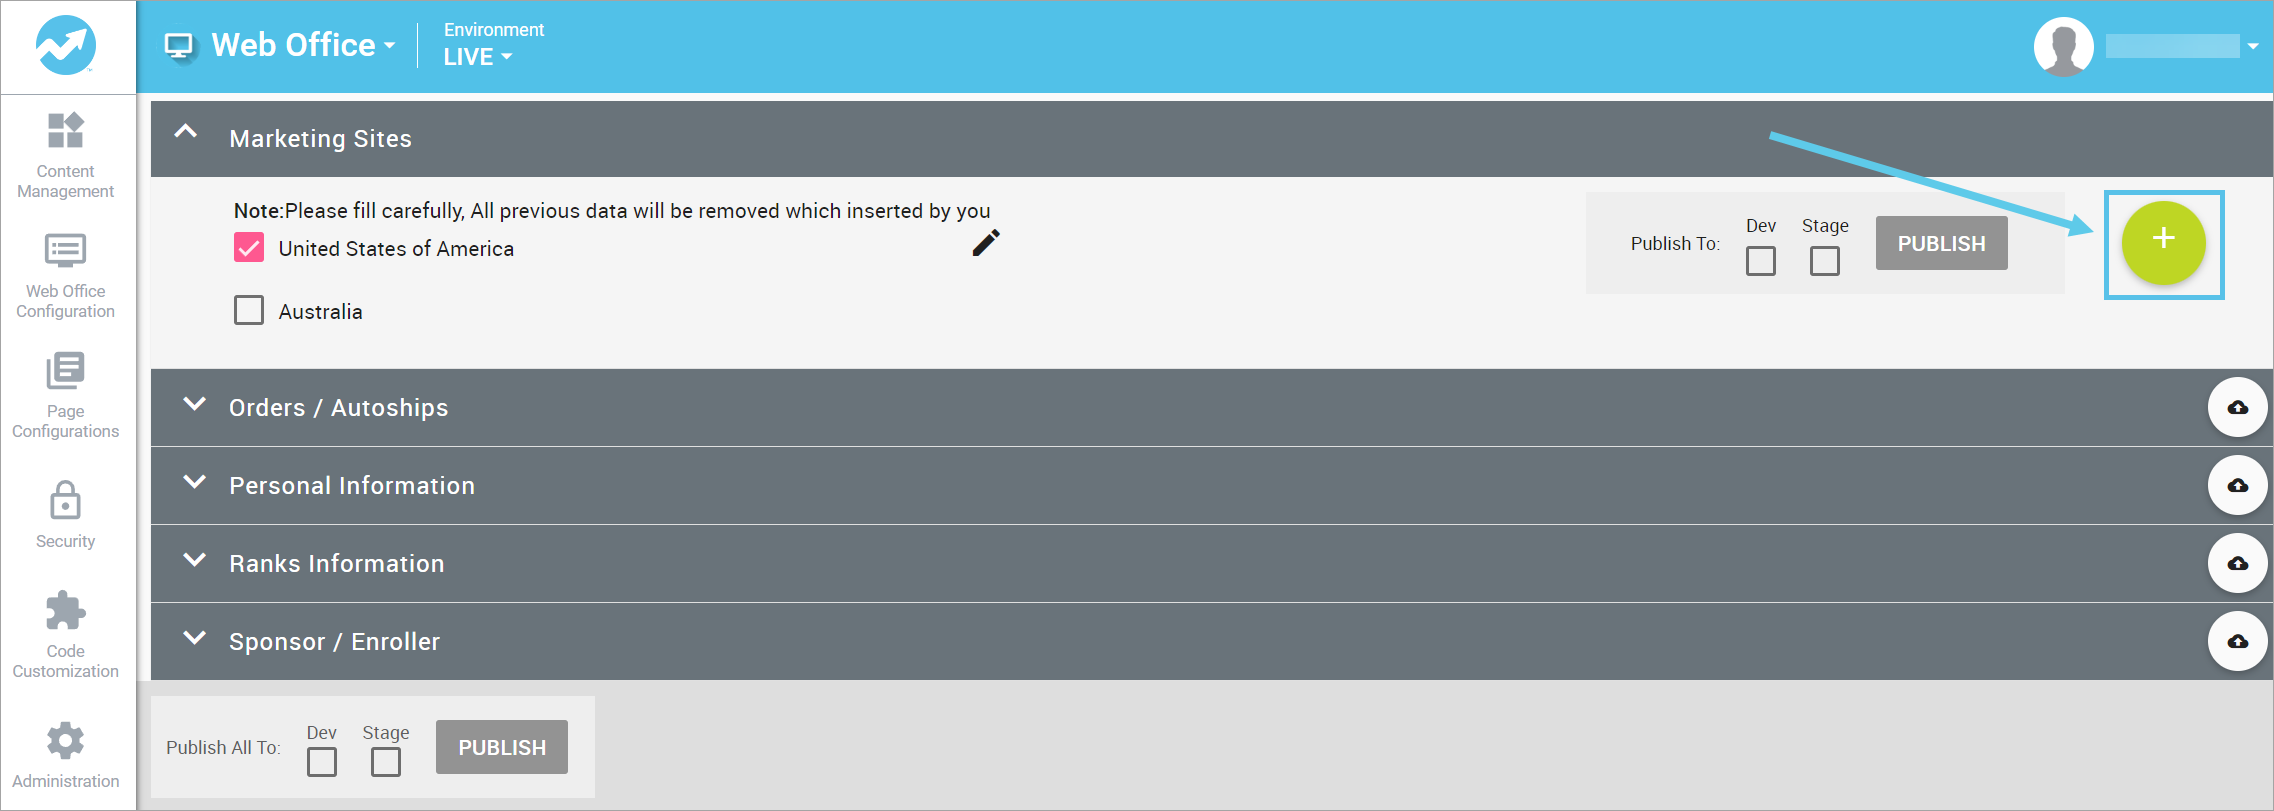
Click the button to open the Marketing Sites pop-up window
-
Under the SETTINGS tab, enter your replicated site URL(s) in the field(s) and include
replace_WebAliaswherever the Associate’s username/site name appears in the URL.The Associate’s username/site name will automatically swap in the URL in the Web Office widget.
For example,
shop.companysite.com/replace_WebAliasorreplace_WebAlias.companysite.comYour URL structure may vary. 
Learn more in Setting Up Default Webalias.
Next, you’ll want to select the various widget elements to include:
-
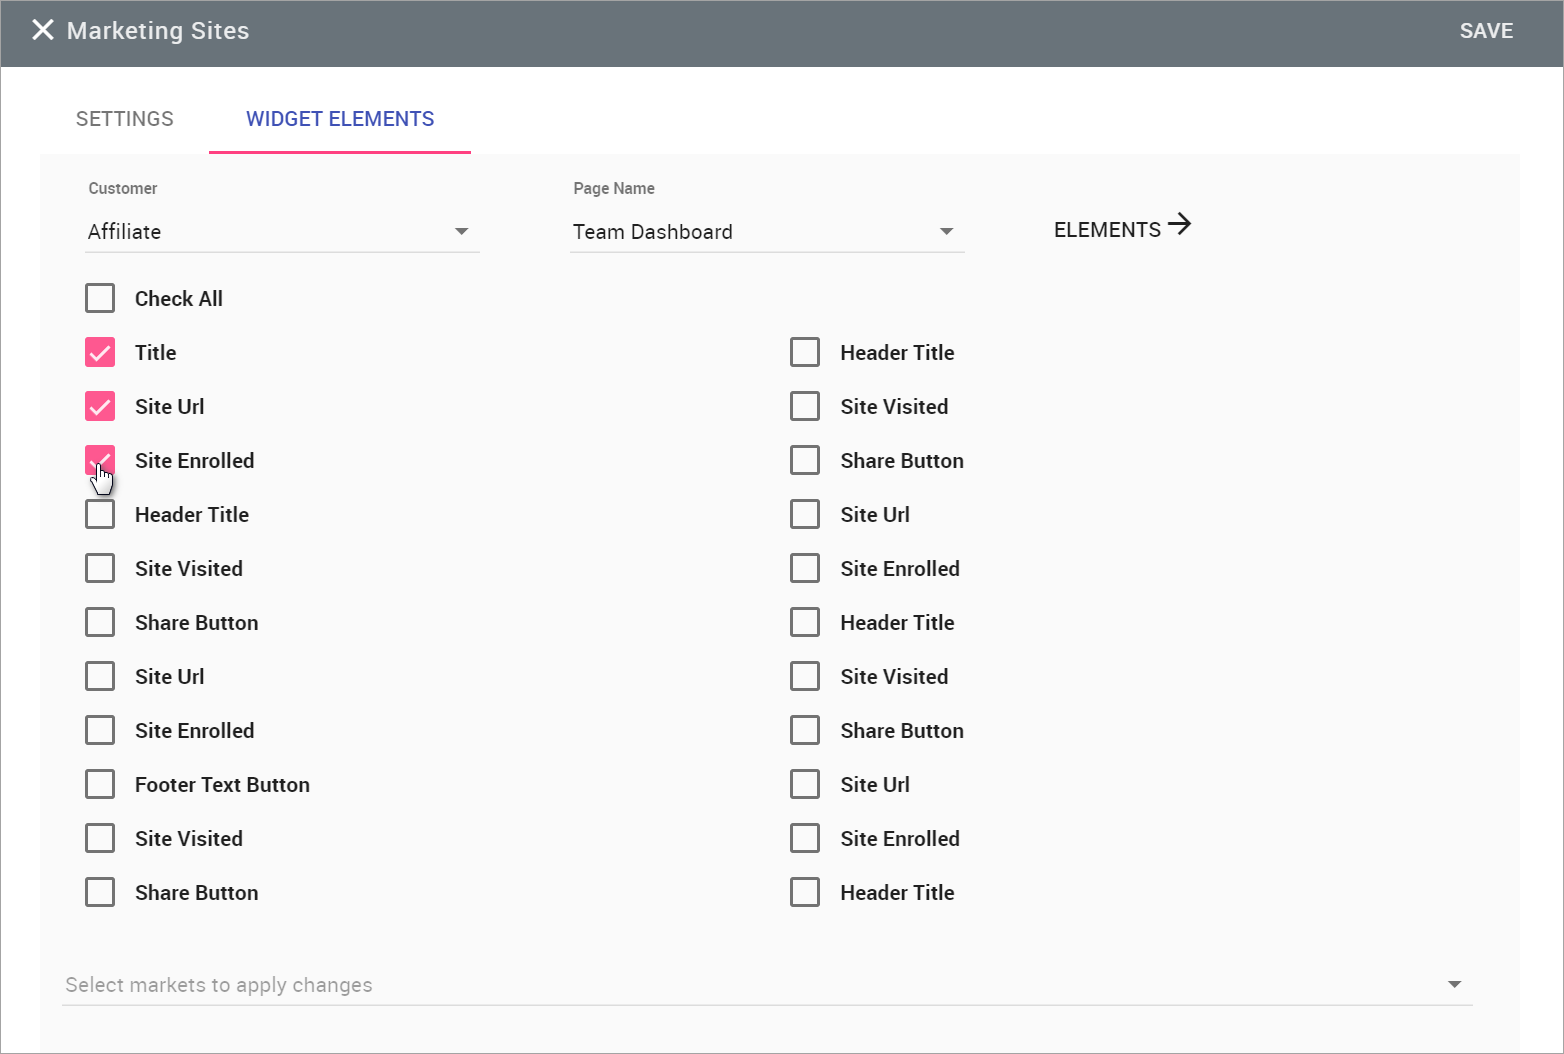
Under the WIDGET ELEMENTS tab, select the Customer Type.
Customer Type is another name for Associate Type, read more in Base Associate Types, Associate Types, and Price Groups Explained.
-
Select the Page Name where the widget is located (either the Homepage or Team Dashboard).
-
Select the markets (i.e., countries) where the changes will apply.
-
Click the ELEMENTS button.
-
A series of checkboxes appear where you can select different elements to include in the Web Office Home > Marketing Sites widget.
-
Click SAVE. Repeat the steps for each market if necessary.
Setting up the Visited and Enrolled Counters
Admin: Web Office Admin
Page: Code Customization > Tracked Sites
URL: [CLIENTID].admin.directscale.com/#/TrackedSites
Permission: Tracked Sites
Before the Visited and Enrolled counters on the Home > Marketing Sites widget will work fully, you must add the marketing site URL to the Code Customization > Tracked Sites page.
-
Click the ADD TRACKED SITE button to open the Add Tracked Site pop-up window.

-
In the URL field, enter your Marketing Site URL with
/wwwas the default webalias.For example, if the Marketing Site URL that you entered previously looked like
shop.companysite.com/replace_WebAlias, then for this step, you would entershop.companysite.com/www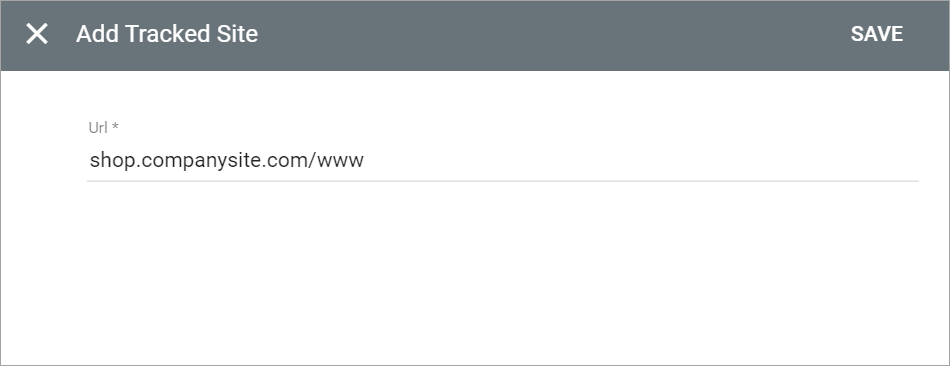
-
Click SAVE. Repeat for each Marketing Site URL.
Orders/Autoships
Admin: Web Office Admin
Page: Advanced Settings > Widgets
URL: [CLIENTID].admin.directscale.com/#/WidgetsSetup
Permission: Setup Widgets

-
Expand the Orders/Autoships section.
-
Click the button to open the Orders/Autoships pop-up window.
-
Under the SETTINGS tab, select one or more of Order Statuses types you want to display in the widget.
Order Statuses include:
-
Waiting Payment
-
Paid
-
Partial Paid
-
Refunded
-
Shipped
-
Partial Shipped
-
Returned
-
Processing RMA
-
Awaiting Shipment
-
Partial Returned
-
Pending Processing
-
Card Declined. Call Issuer.
-
Card Under Review.
-
-
Select one or more of AutoOrder Statuses types you want to display in the widget.
AutoOrder Statuses include:
-
Active
-
Inactive
-
Next, you’ll want to select the various widget elements to include:
-
Under the WIDGET ELEMENTS tab, select the Customer Type.
Customer Type is another name for Associate Type, read more in Base Associate Types, Associate Types, and Price Groups Explained.
-
Select the Page Name where the widget is located (either the Homepage or Team Dashboard).
-
Select the markets (i.e., countries) where the changes will apply.
-
Click the ELEMENTS button.
-
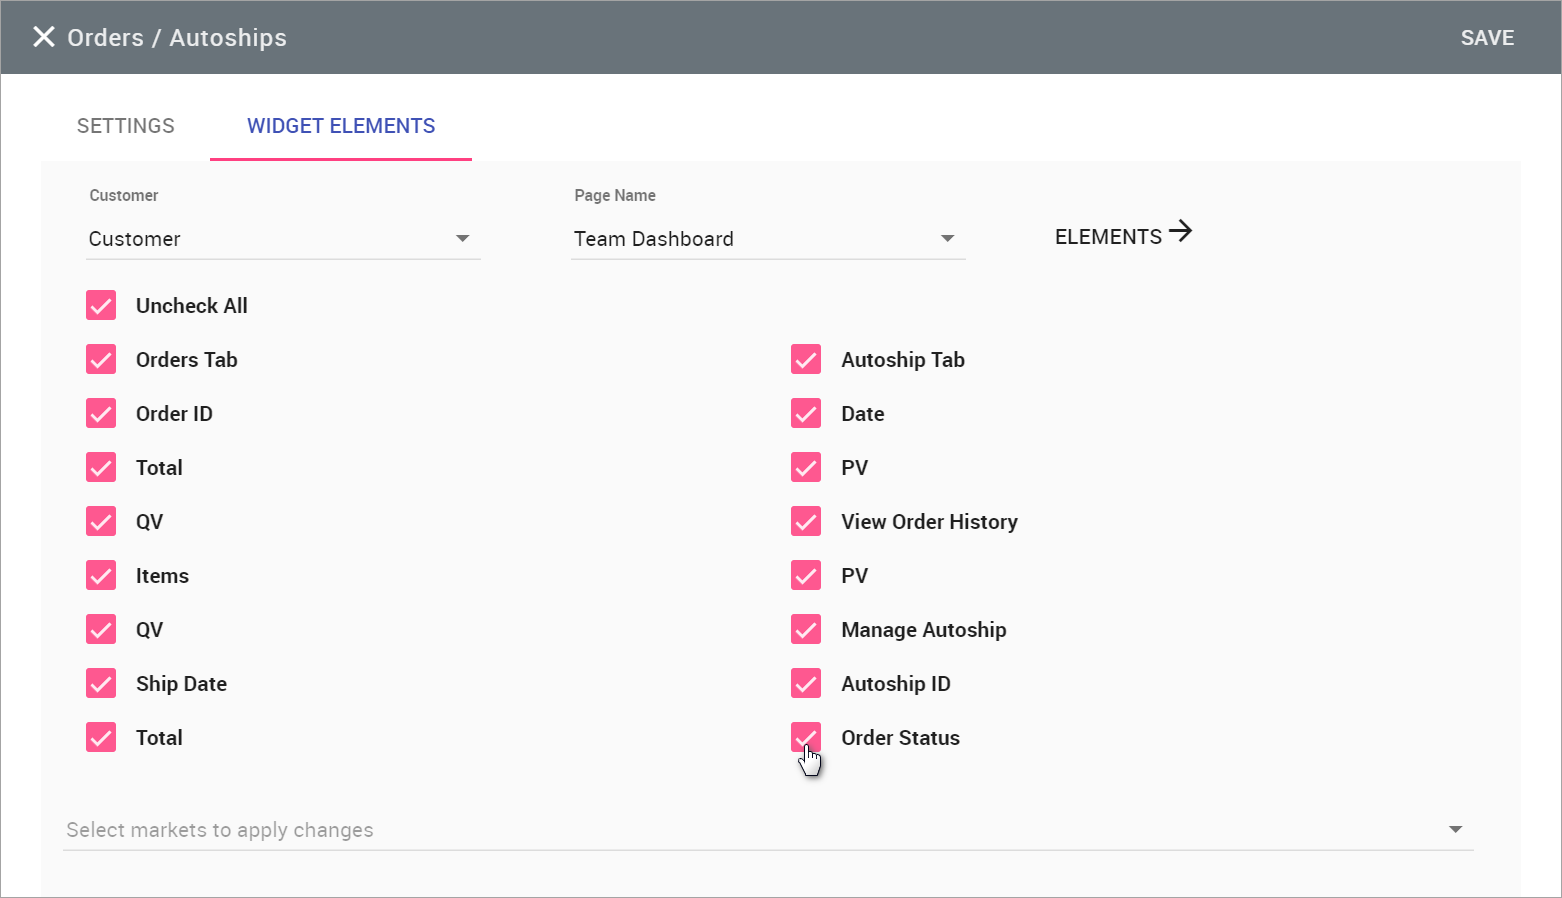
A series of checkboxes appear where you can select different elements to include in the Web Office Team Dashboard > Orders/Autoships widget.
-
Click SAVE. Repeat the steps for each market, if necessary.
Personal Information
Admin: Web Office Admin
Page: Advanced Settings > Widgets
URL: [CLIENTID].admin.directscale.com/#/WidgetsSetup
Permission: Setup Widgets
The data types that appear in the widget can be customized in Web Office Admin.

-
Expand the Personal Information section.
-
Click the button to open the Personal Information pop-up window.
| The SETTINGS tab contains no options in this configuration. |
Next, you’ll want to select the various widget elements to include:
-
Under the WIDGET ELEMENTS tab, select the Customer Type.
Customer Type is another name for Associate Type, read more in Base Associate Types, Associate Types, and Price Groups Explained.
-
Select the Page Name where the widget is located. The only option is Team Dashboard.
-
Select the markets (i.e., countries) where the changes will apply.
-
Click the ELEMENTS button.
-
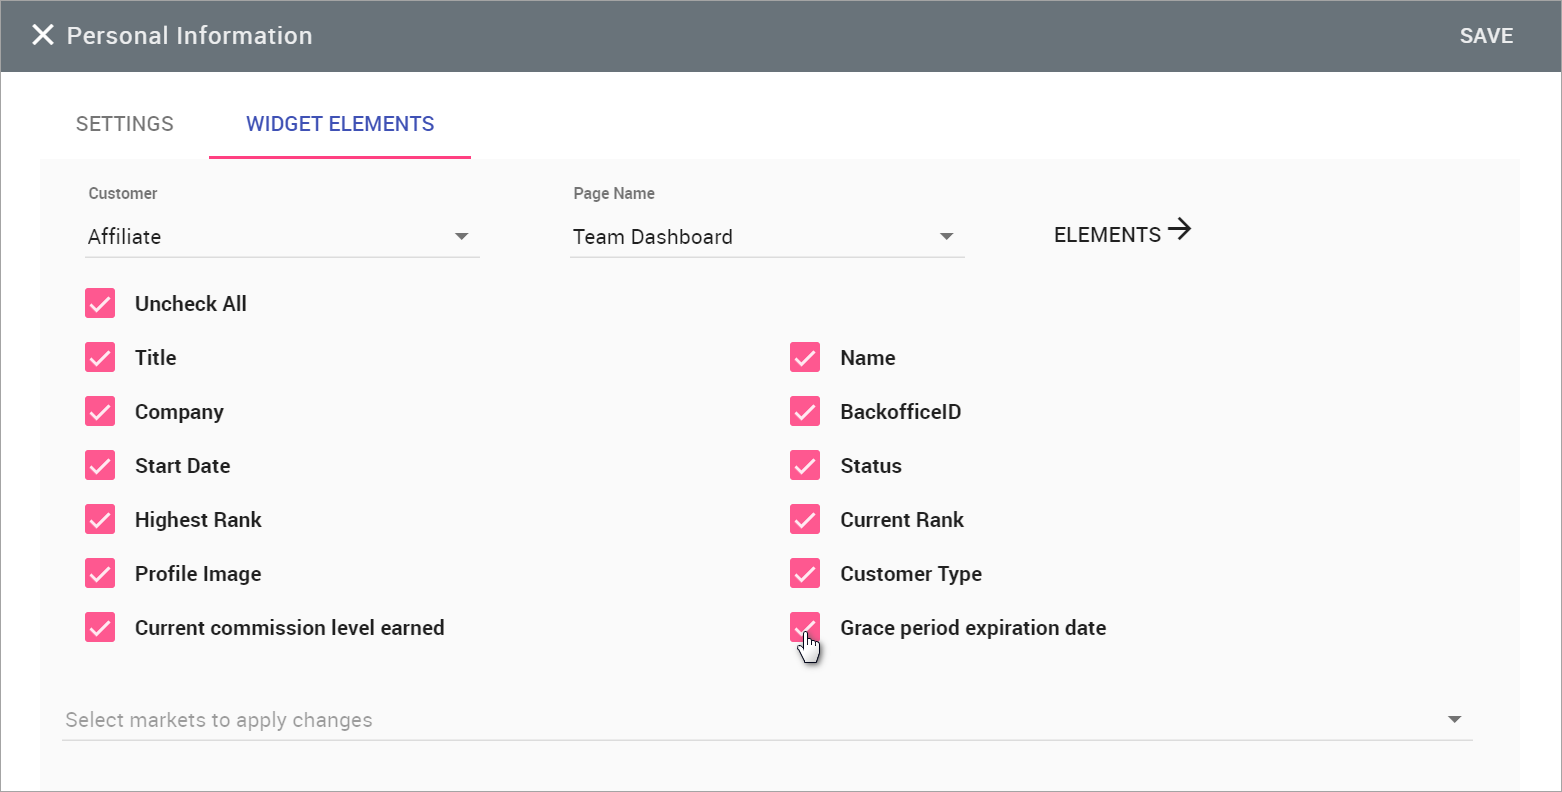
A series of checkboxes appear where you can select different elements to include in the Web Office Team Dashboard > Personal Information widget.
-
Click SAVE. Repeat the steps for each market if necessary.
Rank Information
Admin: Web Office Admin
Page: Advanced Settings > Widgets
URL: [CLIENTID].admin.directscale.com/#/WidgetsSetup
Permission: Setup Widgets
The data types and tabs that appear in the widget can be customized in Web Office Admin. This section shows you the steps involved.

-
Expand the Ranks Information section.
-
Click the button to open the Ranks Information pop-up window.
-
Select the rank to be displayed by default.
Next, you’ll want to select the various widget elements to include:
-
Under the WIDGET ELEMENTS tab, select the Customer Type.
Customer Type is another name for Associate Type, read more in Base Associate Types, Associate Types, and Price Groups Explained.
-
Select the Page Name where the widget is located (either the Homepage or Team Dashboard).
-
Select the markets (i.e., countries) where the changes will apply.
-
Click the ELEMENTS button.
-
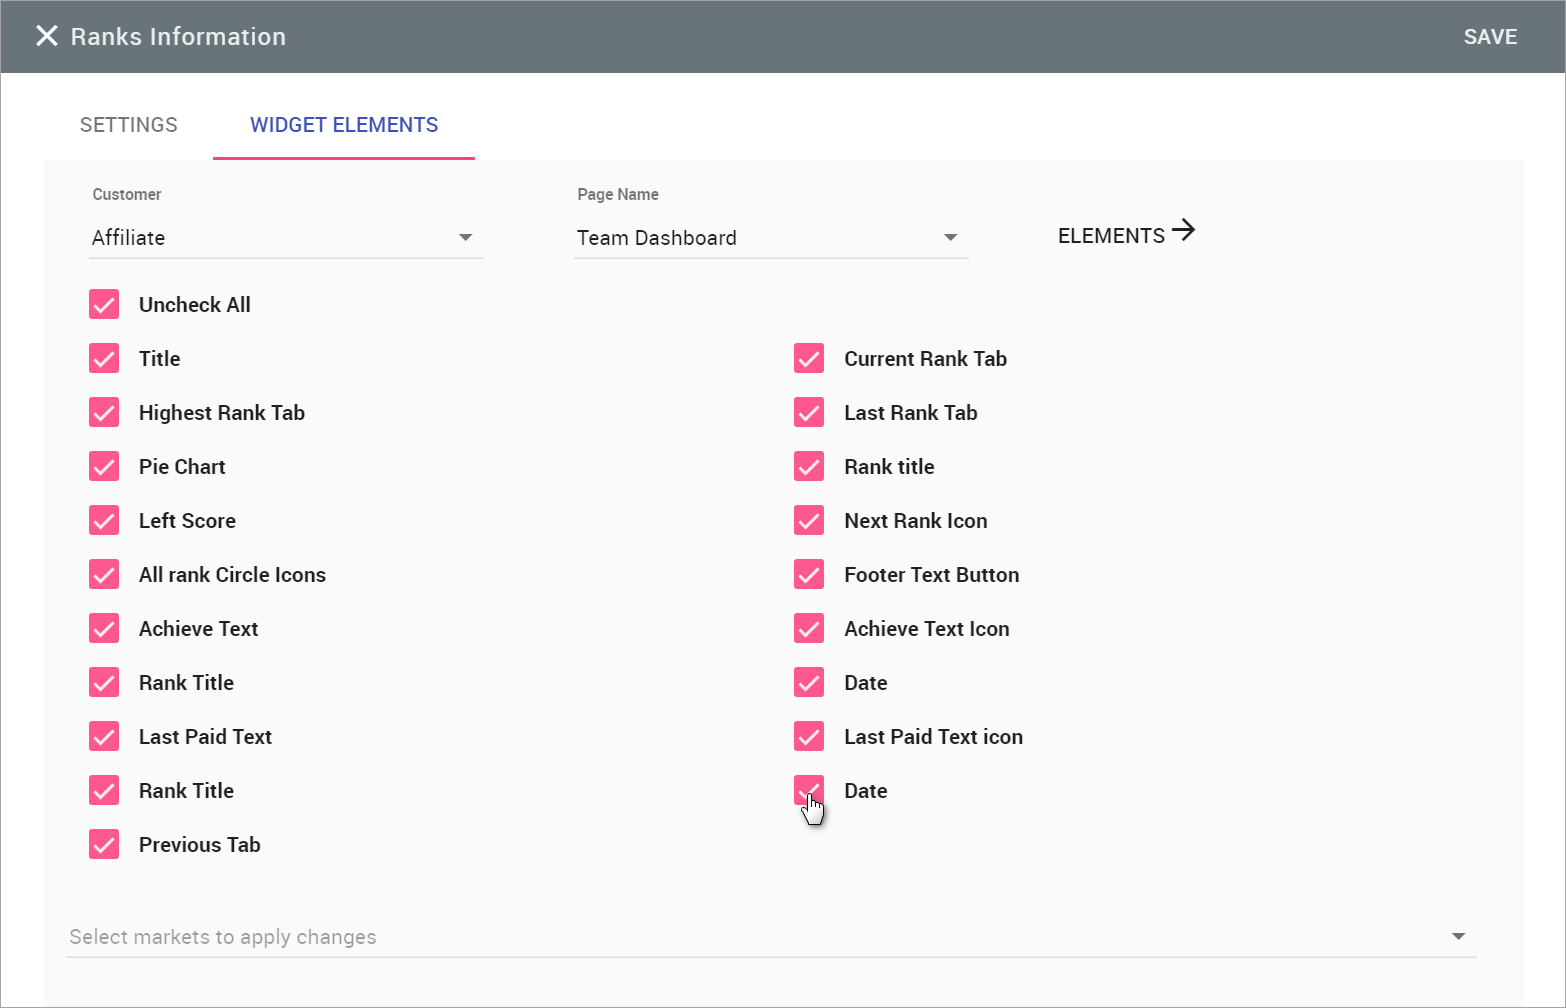
A series of checkboxes appear where you can select different elements to include in the Web Office Home > Ranks Information widget.
-
Click SAVE. Repeat the steps for each market if necessary.
Sponsor/Enroller
Admin: Web Office Admin
Page: Advanced Settings > Widgets
URL: [CLIENTID].admin.directscale.com/#/WidgetsSetup
Permission: Setup Widgets
The data types that appear in the widget can be customized in Web Office Admin.

-
Expand the Sponsor/Enroller section.
-
Click the button to open the Sponsor/Enroller pop-up window.
| The SETTINGS tab contains no options in this configuration. |
Next, you’ll want to select the various widget elements to include:
-
Under the WIDGET ELEMENTS tab, select the Customer Type.
Customer Type is another name for Associate Type, read more in Base Associate Types, Associate Types, and Price Groups Explained.
-
Select the Page Name where the widget is located. The only option is Team Dashboard).
-
Select the markets (i.e., countries) where the changes will apply.
-
Click the ELEMENTS button.
-
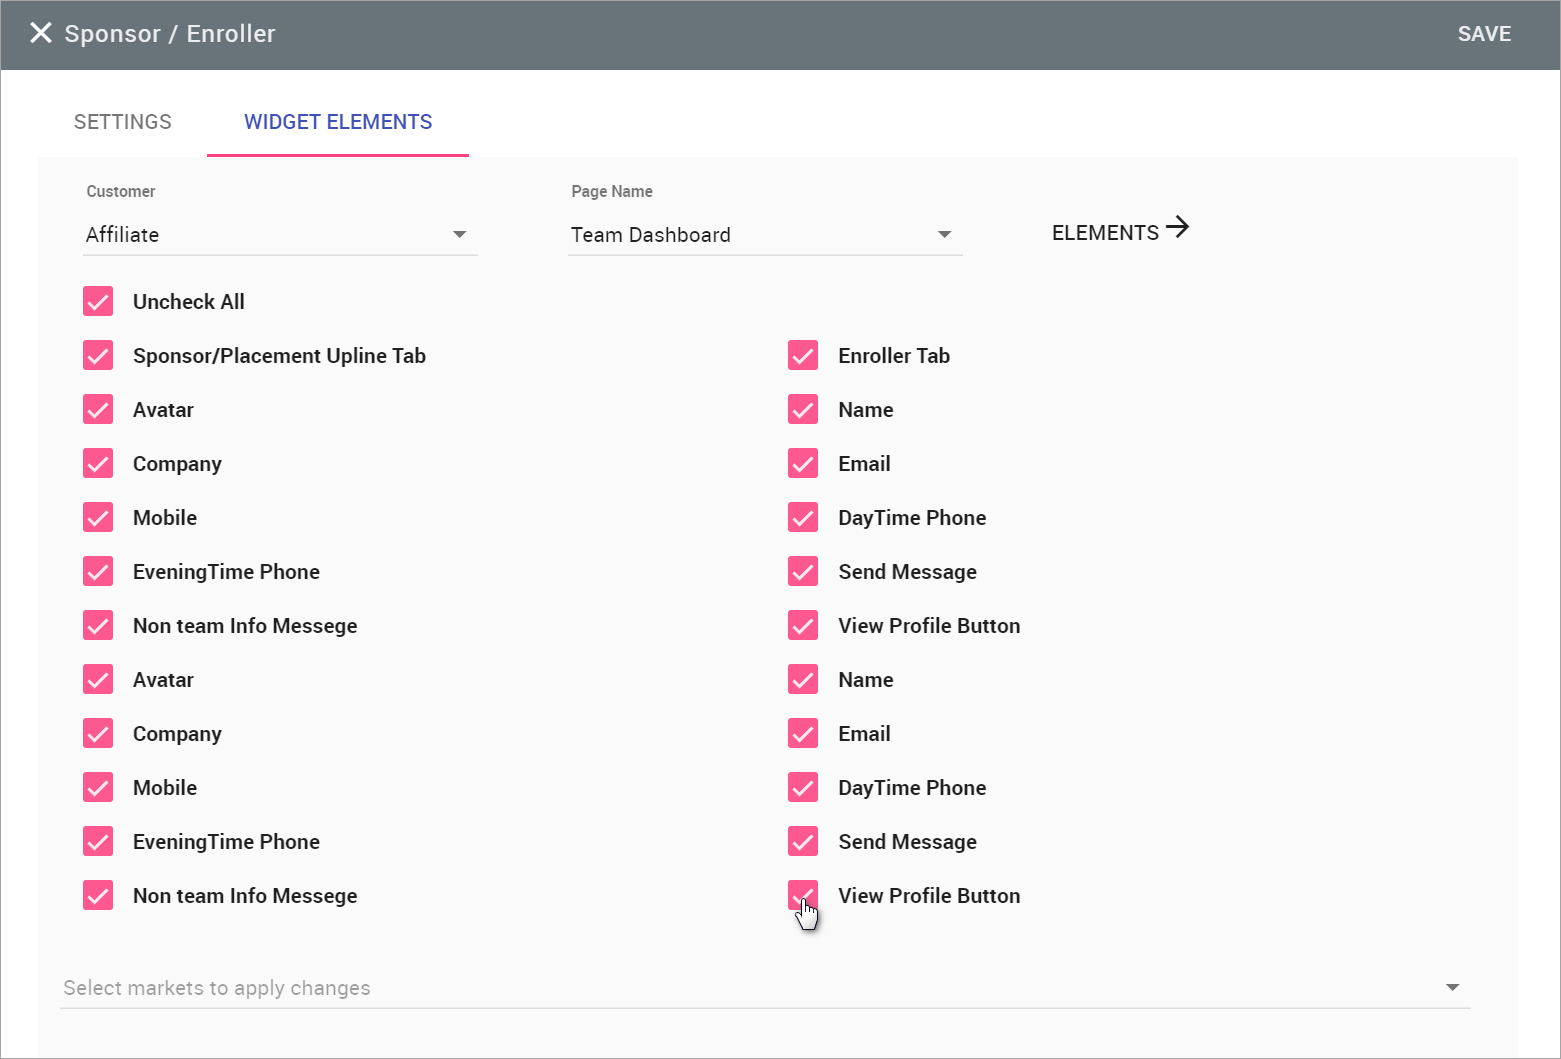
A series of checkboxes appear where you can select different elements to include in the Web Office Team Dashboard > Sponsor/Enroller widget.
-
Click SAVE. Repeat the steps for each market if necessary.
Comments
Please sign in to leave a comment.