Admin: Corporate Admin
Page: Settings > Advanced Settings > Configure Trees
URL: [CLIENTID].corpadmin.directscale.com/Settings/TreeConfiguration
Permission: ViewAdministration(), ViewAdvancedSettings()
Warning: Do not change Tree settings after initialization. Contact Customer Care for any assistance.
You can enable, disable, and customize the configurations of your Trees.
Enrollment Trees
-
Navigate to the Configure Trees page.
-
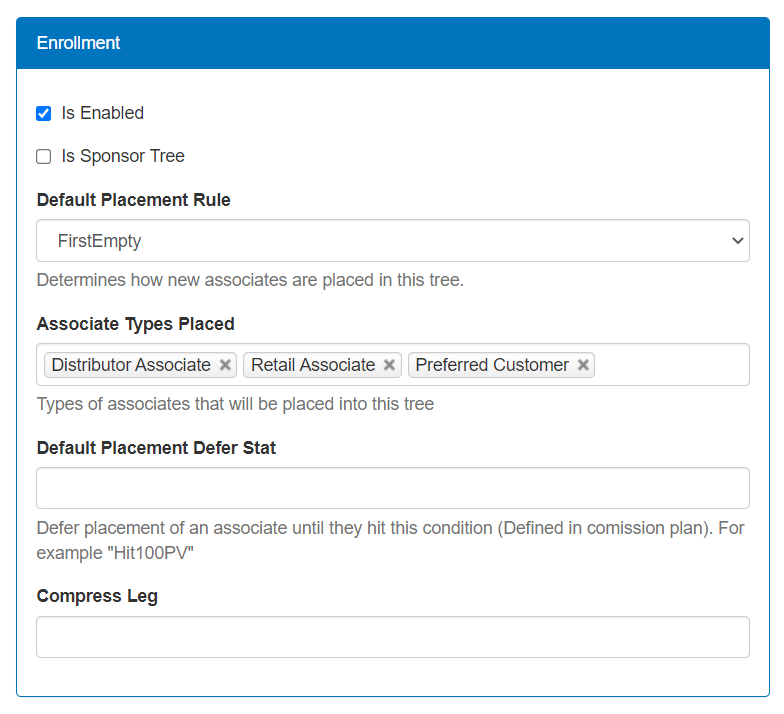
Locate the Enrollment section.
-
Configure the following settings to your preference:
-
Is Enabled – Enable the Tree.
-
Is Sponsor Tree – Set this Tree type to function as the Sponsor Tree. You can only select this setting for one of your enabled Trees at a time.
-
Default Placement Rule - Select an option that determines how the system places new Associates in this Tree. Options include:
-
DoNotPlace – Do not place the Associate in any Tree.
-
Defer – Only enroll an Associate once they’ve met a certain stat qualification. This setting works in conjunction with the Default Placement Defer Stat setting. If applicable:
- Select Defer.
- Enter the Rule’s Key from your compensation plan into the Default Placement Defer Stat field.
-
FirstEmpty – Place the Associate in the first available location.
-
FirstEmptyRollup – The system checks if it placed the Associate’s Enroller in the Tree. If not, it will enroll the Associate within the next open spot of the Enroller’s Sponsor.
-
Strong – The Associate places in the Leg with the most primary volume.
-
Weak – The Associate places in the Leg with the least primary volume.
-
Inside, Outside, Left, Right – Do not use. These options only work for Binary and Matrix Trees.
-
CollapseRetail – When a Retail Associate signs up under another Retail Associate, it tells the system not to keep the Tree hierarchy and will instead collapse them up.
-
UsePreference – Do not use. These options only work for Binary Trees.
-
-
Associate Types Placed – Select which Associate Types to place in this Tree.
-
Default Placement Defer Stat – You can have a Rule in your compensation plan with criteria that an Associate must meet before the system places them in this Tree. If applicable:
- Enter the Rule’s Key from your compensation plan into this field.
- Select Defer in the Default Placement Rule dropdown.
-
Compress Leg - Do not use. This field only works for Binary and Matrix Trees.
-
-
Click Save Changes.
Unilevel Trees
-
Navigate to the Configure Trees page.
-
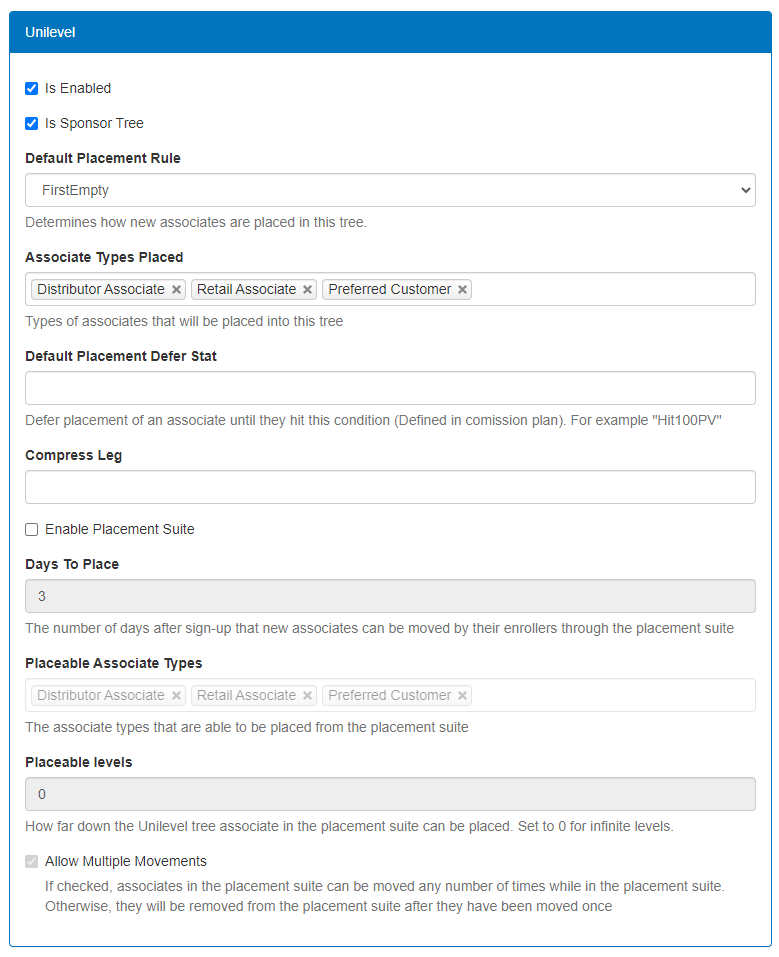
Locate the Unilevel section.
-
Configure the following settings to your preference:
-
Is Enabled – Enable the Tree.
-
Is Sponsor Tree – Set this Tree type to function as the Sponsor Tree. You can only select this setting for one of your enabled Trees at a time.
-
Default Placement Rule - Select an option that determines how the system places new Associates in this Tree. Options include:
-
DoNotPlace – Do not place the Associate in any Tree.
-
Defer – Only enroll an Associate once they’ve met a certain stat qualification. This setting works in conjunction with the Default Placement Defer Stat setting. If applicable:
- Select Defer.
- Enter the Rule’s Key from your compensation plan into the Default Placement Defer Stat field.
-
FirstEmpty – Place the Associate in the first available location.
-
FirstEmptyRollup – The system checks if it placed the Associate’s Enroller in the Tree. If not, it will enroll the Associate within the next open spot of the Enroller’s Sponsor.
-
Strong – The Associate places in the Leg with the most primary volume.
-
Weak – The Associate places in the Leg with the least primary volume.
-
Inside, Outside, Left, Right – Do not use. These options only work for Binary and Matrix Trees.
-
CollapseRetail – When a Retail Associate signs up under another Retail Associate, it tells the system not to keep the Tree hierarchy and will instead collapse them up.
-
UsePreference – Do not use. These options only work for Binary Trees.
-
-
Associate Types Placed – Select which Associate Types to place in this Tree.
-
Default Placement Defer Stat – You can have a Rule in your compensation plan with criteria that an Associate must meet before the system places them in this Tree. If applicable:
- Enter the Rule’s Key from your compensation plan into this field.
- Select Defer in the Default Placement Rule dropdown.
-
Compress Leg - Do not use. This field only works for Binary and Matrix Trees.
-
The rest of the settings pertain to the Web Office Placement Suite. Learn more in Setting up the Placement Suite.
-
-
Click Save Changes.
Binary Trees
-
Navigate to the Configure Trees page.
-
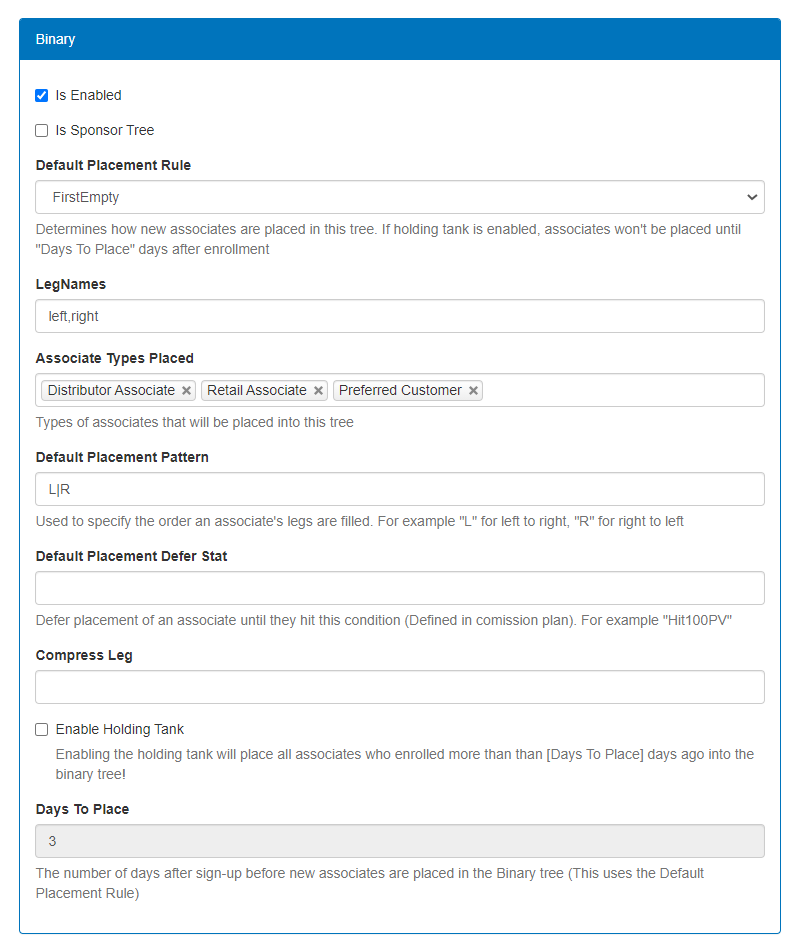
Locate the Binary section.
-
Configure the following settings to your preference:
-
Is Enabled – Enable the Tree.
-
Is Sponsor Tree – Set this Tree type to function as the Sponsor Tree. You can only select this setting for one of your enabled Trees at a time.
-
Default Placement Rule - Select an option that determines how the system places new Associates in this Tree. Options include:
-
DoNotPlace – Do not place the Associate in any Tree.
-
Defer – Only enroll an Associate once they’ve met a certain stat qualification. This setting works in conjunction with the Default Placement Defer Stat setting. If applicable:
- Select Defer.
- Enter the Rule’s Key from your compensation plan into the Default Placement Defer Stat field.
-
FirstEmpty – Place the Associate in the first available location.
-
FirstEmptyRollup – The system checks if it placed the Associate’s Enroller in the Tree. If not, it will enroll the Associate within the next open spot of the Enroller’s Sponsor.
-
Strong – The Associate places in the Leg with the most primary volume.
-
Weak – The Associate places in the Leg with the least primary volume.
-
Inside - The Associate places on the Inside Leg.
-
Outside - The Associate places on the Outside Leg.
-
Left - The Associate places on the Left Leg.
-
Right - The Associate places on the Right Leg.
-
CollapseRetail – When a Retail Associate signs up under another Retail Associate, it tells the system not to keep the Tree hierarchy and will instead collapse them up.
-
UsePreference – Allows Associates to determine their Tree rules by adding the Settings > Binary Placement Preferences widget to the Web Office using the Web Office Admin.
-
-
LegNames – Enter names for your Tree’s Legs. Separate the names with a comma and no spaces. For example,
Left,Middle,Right. The first entry always names the Left Leg. Additional names will continue to name the next Leg after. -
Associate Types Placed – Select which Associate Types to place in this Tree.
-
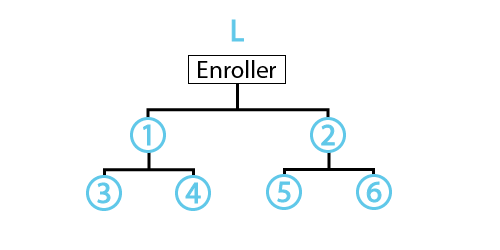
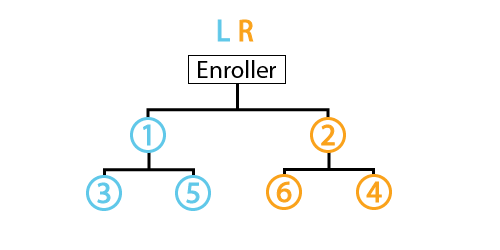
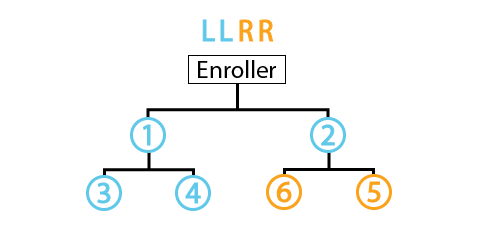
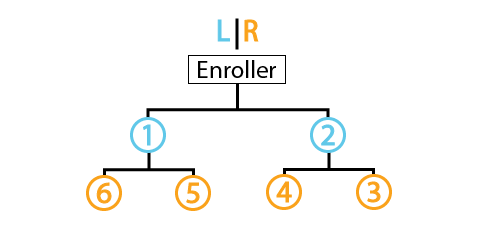
Default Placement Pattern – This field allows you to create a Tree placement pattern for newly enrolled Associates.
The entry options are:
-
L – Will add an Associate on the next open Left Leg in a Tree.
-
R – Will add an Associate on the next open Right Leg in a Tree.
-
B – This option is added at the end of a pattern sequence and will enroll new Associates to keep the number of Associates in each Leg equal.
-
| – When this option is placed between two pattern sequences, it will alternate between the patterns at the start of a new generation. You can customize these to your preference and without limit. Some popular examples for placement patterns include:

-
-
Default Placement Defer Stat – You can have a Rule in your compensation plan with criteria that an Associate must meet before the system places them in this Tree. If applicable:
- Enter the Rule’s Key from your compensation plan into this field.
- Select Defer in the Default Placement Rule dropdown.
-
Compress Leg – When an Associate is deleted, the Leg name entered in this field is the one that will compress the Generations below to balance and fill in the blank place for the deleted Associate.
This feature is optional. If you choose to use the function, please contact Customer Care before configuring; improper configurations can cause issues with site functionality.
-
Enable Holding Tank - Select this checkbox to enable the Web Office Holding Tank. The Holding Tank will place all Associates into the Binary Tree who enrolled more than the specified days ago. If applicable:
- Enable the Enable Holding Tank checkbox.
- Enter an amount in the Days To Place field.
Automatic placement into the Binary Tree via either Corporate default OR Personal Preference requires the PlaceExpiredHoldingTankAssociatesAPI to be run. This can be executed in the Daily Run or by a Hook in the Client Extension. Please contact Customer Care or your Launch Manager to implement the Daily Run. -
Days To Place - Enter The number of days after sign-up before the system places new Associates in the Binary Tree. If applicable:
- Select the applicable Default Placement Rule.
- Enable the Enable Holding Tank checkbox.
- Enter an amount in the Days To Place field.
-
-
Click Save Changes.
Matrix Trees
-
Navigate to the Configure Trees page.
-
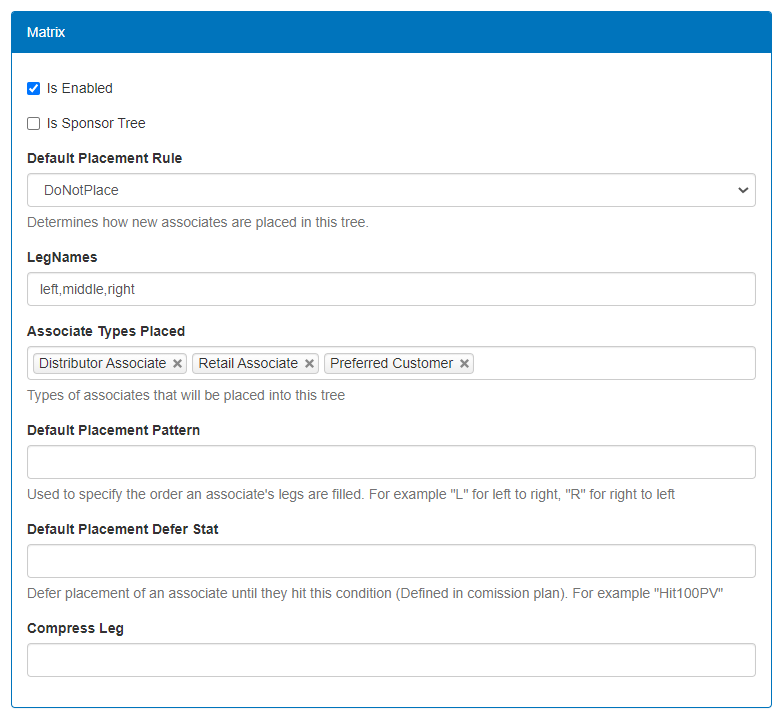
Locate the Matrix section.
-
Configure the following settings to your preference:
-
Is Enabled – Enable the Tree.
-
Is Sponsor Tree – Set this Tree type to function as the Sponsor Tree. You can only select this setting for one of your enabled Trees at a time.
-
Default Placement Rule - Select an option that determines how the system places new Associates in this Tree. Options include:
-
DoNotPlace – Do not place the Associate in any Tree.
-
Defer – Only enroll an Associate once they’ve met a certain stat qualification. This setting works in conjunction with the Default Placement Defer Stat setting. If applicable:
- Select Defer.
- Enter the Rule’s Key from your compensation plan into the Default Placement Defer Stat field.
-
FirstEmpty – Place the Associate in the first available location.
-
FirstEmptyRollup – The system checks if it placed the Associate’s Enroller in the Tree. If not, it will enroll the Associate within the next open spot of the Enroller’s Sponsor.
-
Strong – The Associate places in the Leg with the most primary volume.
-
Weak – The Associate places in the Leg with the least primary volume.
-
Inside - The Associate places on the Inside Leg.
-
Outside - The Associate places on the Outside Leg.
-
Left - The Associate places on the Left Leg.
-
Right - The Associate places on the Right Leg.
-
CollapseRetail – When a Retail Associate signs up under another Retail Associate, it tells the system not to keep the Tree hierarchy and will instead collapse them up.
-
UsePreference – Allows Associates to determine their Tree rules by adding the Settings > Binary Placement Preferences widget to the Web Office using the Web Office Admin.
-
-
LegNames – Enter names for your Tree’s Legs. Separate the names with a comma and no spaces. For example,
Left,Middle,Right. The first entry always names the Left Leg. Additional names will continue to name the next Leg after. -
Associate Types Placed – Select which Associate Types to place in this Tree.
-
Default Placement Pattern – This field allows you to create a Tree placement pattern for newly enrolled Associates.
The entry options are:
-
L – Will add an Associate on the next open Left Leg in a Tree.
-
R – Will add an Associate on the next open Right Leg in a Tree.
-
B – This option is added at the end of a pattern sequence and will enroll new Associates to keep the number of Associates in each Leg equal.
-
| – When this option is placed between two pattern sequences, it will alternate between the patterns at the start of a new generation. You can customize these to your preference and without limit. Some popular examples for placement patterns include:


-
-
Default Placement Defer Stat – You can have a Rule in your compensation plan with criteria that an Associate must meet before the system places them in this Tree. If applicable:
- Enter the Rule’s Key from your compensation plan into this field.
- Select Defer in the Default Placement Rule dropdown.
-
Compress Leg – When an Associate is deleted, the Leg name entered in this field is the one that will compress the Generations below to balance and fill in the blank place for the deleted Associate.
This feature is optional. If you choose to use the function, please contact Customer Care before configuring; improper configurations can cause issues with site functionality.
-
-
Click Save Changes.
Comments
Please sign in to leave a comment.