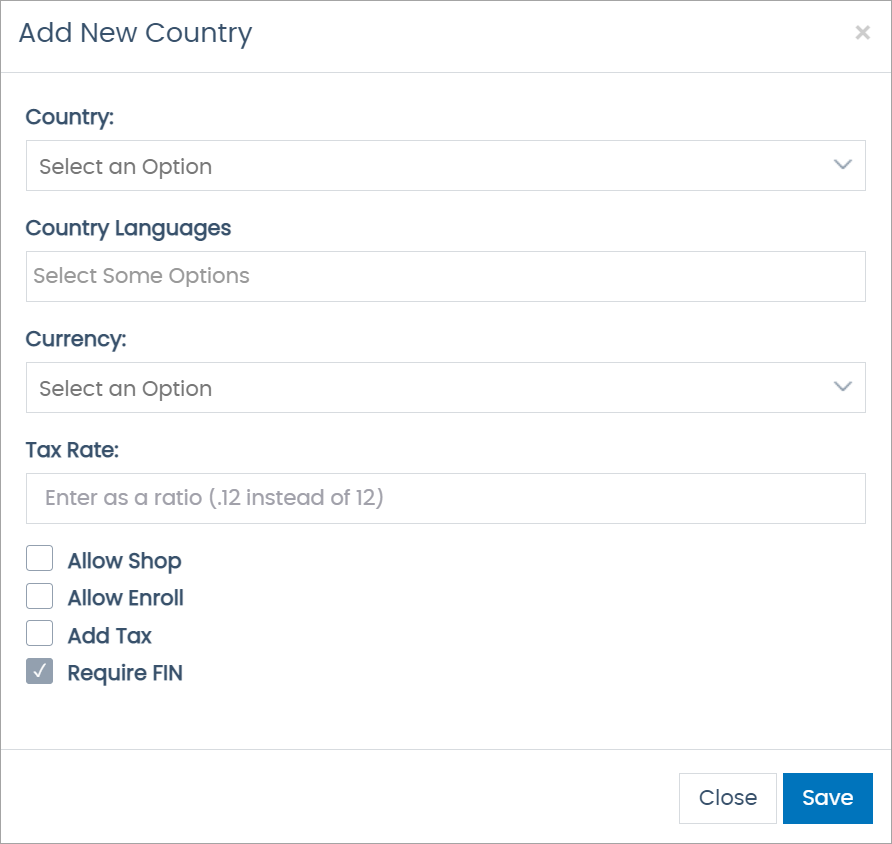
Adding a country makes that country available to select throughout the system. When you add a country, you add the country’s primary language as well. You must add each country to all three Admin locations.
In Corporate Admin
Admin: Corporate Admin
Page: Settings > Company Settings > Countries
URL: [CLIENTID].corpadmin.directscale.com/Corporate/Admin/CountryInfo
Permission: ViewAdministration()
-
Click the + Add Country button.

The Add New Country pop-up window opens.

-
In the pop-up, select a Country.
- Select one or more Country Languages.
-
Select a Currency.
-
Configurate the Tax Rate.
There are two ways you can configure how taxes are applied to inventory items:
- Tax is not added to the price until checkout.
- Type a TaxRate as a decimal (.12 instead of 12).
- Uncheck the Add Tax checkbox.
- The displayed price includes tax in the stores (Value Added Tax (VAT) Inclusive Pricing).
- Enter a TaxRate in the field.
- Check the Add Tax checkbox.
- Tax is not added to the price until checkout.
-
Under the Tax Rate drop-down, select any necessary checkboxes.
- Allow Shop: Enables shopping in Web Office.
- Allow Enroll: Enables enrollment.
- Add Tax: Apply applicable taxes to orders in this country.
- Require FIN: An Associate must have a Social Security Number (SSN) or Federal Identification Number (FIN) tied to their account.
-
Click Save.
In Web Office Admin
Admin: Web Office Admin
Page: Advanced Settings > Details
URL: [CLIENTID].admin.directscale.com/#/Details
Permission: Setup Details
-
Expand the Country and Languages section.
-
Click the + button. The Add Country and Language Setup pop-up window opens.
-
In the pop-up, select the Country, Language(s), Currency, Date Format, and Time Format.
Warning: The Allowed Address Verification toggle is for Squire Tax Integration. If your tax provider is not Squire, turning on this setting will cause address verification errors.
-
Click ADD.
Important: Follow the Syncing Countries and Languages section below, if countries and languages added don’t appear.
In eCommerce Admin
Admin: eCommerce Admin
Page: Company Setting > Details
URL: [CLIENTID].retailadmin.directscale.com/#/CompanyDetails
Permission: Setup Details
-
Expand the Country and Languages section.
-
Click the + button. The Add Country and Language Setup pop-up window opens.
-
In the pop-up, select the Country, Language(s), Currency, Date Format, and Time Format.
Warning: The Allowed Address Verification toggle is for Squire Tax Integration. If your tax provider is not Squire, turning on this setting will cause address verification errors.
-
Click ADD.
Note: Due to browser caching, countries and languages added in eCommerce Admin may take a couple of hours to show up. Try clearing your browser’s cache or opening the page up in a New Incognito Window.
Important: Follow the Syncing Countries and Languages section below, if countries and languages added continue to not show.
Syncing Countries and Languages
Admin: Web Office Admin
Page: Web Office Configuration > Countries and Languages
URL: [CLIENTID].admin.directscale.com/#/Countries
Role: Administrator
You’ll need to sync your new countries and languages for the localization system to offer the new language in the Manage Translation module and the Localization page. This feature syncs the countries and languages added in Corporate Admin to Web Office Admin.
-
On the Countries and Languages page, click the SYNC COUNTRIES button.

Your newly added country will appear in the list and is now available for localization.
Reminder: Due to browser caching, countries and languages added in eCommerce Admin may take a couple of hours to show up. Try clearing your browser’s cache or opening the page up in a New Incognito Window.
Comments
Please sign in to leave a comment.