Deprecated: A more up-to-date version of this article can be found in our developer documentation
Warning: This tool is an advanced feature and should be used with the guidance of an experienced compensation plan expert.
Admin: Corporate Admin
Page: Commissions > Compensation Plan XML
URL: [CLIENTID].corpadmin.directscale.com/Corporate/CRM/Commissions/ComPlanDesigner
Permission: EditCompPlan()
✨ Available for Business and Premium tiers
The XML Editor is where you create or edit your commission template using an Extensible Markup Language (XML) editor. The system uses the correctly formatted XML to run Commission Profiles.
Enabling the Page
Admin: Corporate Admin
Page: Advanced Settings > Commission > Compensation Plan
URL: [CLIENTID].corpadmin.directscale.com/Settings?category=Commission
Permission: ViewAdministration(), ViewAdvancedSettings()
To use this feature, you’ll need to enable it:
- Locate the Compensation Plan section.
- Select the Enable XML Editor check box.
Adding a Template
The Template Name dropdown is where you select a previously saved template. The Template Name is defined in the XML:
<ComPeriod Name="Monthly"></ComPeriod>
Typically, the Template Name is the same as the period it represents (Weekly, Monthly, Bi-Monthly, etc.).
- Templates can only be committed once per commission period.
- Volume Adjustments and Rule History are tied to the Template Name and are shared by all the template’s Revisions.
To add a new template:
-
Click the Clone button to make a copy of an existing template.
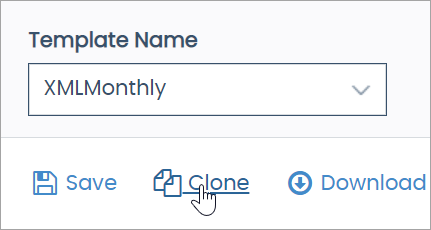
A pop-up window opens, where you can give the copy a name.
-
In the pop-up, enter a name.
-
Click Clone to confirm.
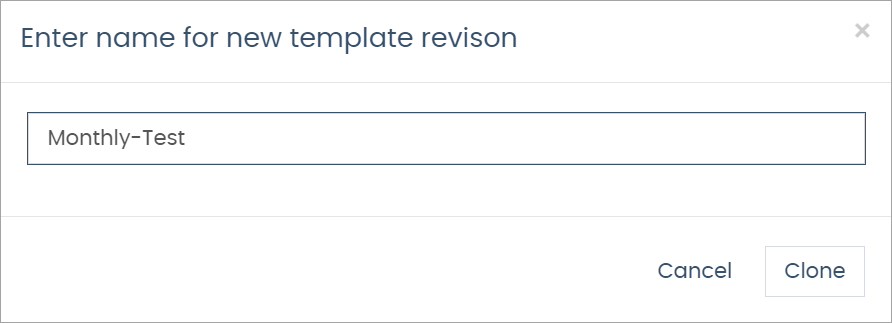
The pop-up closes, and the cloned copy becomes a Template Revision.
-
Change the
<ComPeriod>Nameattribute to the Revision name.
- Every Template Name must have a Revision and
<ComPeriod Name="">with the same name to function correctly. - Template Names and Revisions are case-sensitive and can’t be longer than 50 characters.
- Every Template Name must have a Revision and
-
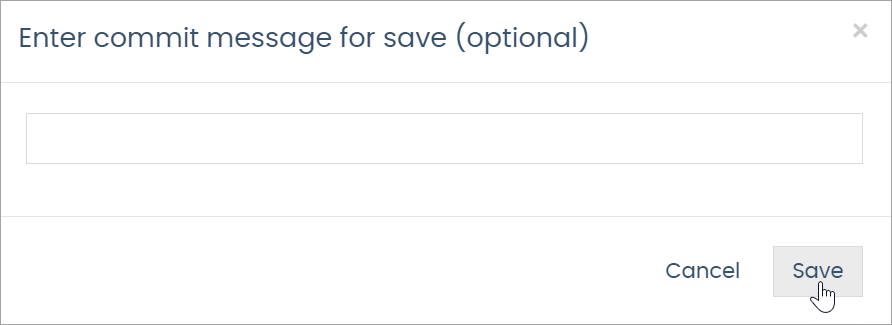
Click the Save button.
-
In the pop-up, add an optional commit message.
-
Click Save to confirm.
-
Refresh the page to see changes.
The Template Name dropdown now shows your new template.
Adding Revisions
A Template Revision is a specific version of a template. Your cloned templates appear in this list.
Revisions should share a name with the main template so that the version History is shared between them. For example, if you have a template named Monthly, you can have cloned Revisions called Monthly-workInProgress, MonthlyTestingNewBonus, etc. This convention allows you to test changes without affecting the main template.
To add a new Revision:
-
Click the Clone button to make a copy of an existing template.
A pop-up window opens, where you can give the copy a name.
-
In the pop-up, enter a name.
-
Click Clone to confirm.
The pop-up closes, and the cloned copy becomes a Template Revision.
Note: Clone will copy from the current XML displayed in the XML Editor, not the most recent save; therefore, your cloned Revision may not match the original Revision if you had unsaved changes.
Setting Revisions as the Main Template
-
Copy/paste the Revision’s XML into the main template.
-
Change the
<ComPeriod>Nameto the Revision name. -
Click the Save button.
-
In the pop-up, add an optional commit message.
-
Click Save to confirm.
-
Refresh the page to see changes.
Following this procedure, you will have a single template with a full History of the different versions to which you can revert.
Saving a Template
Saving commits the changes to the template.
-
Click the Save button.
-
In the pop-up, add an optional commit message.
The commit logs in History.
-
Click Save to confirm.
-
Refresh the page to see changes.
When you save, the system:
- Validates the XML
- Displays a message
- Highlight the errors
Note: You can save changes even if there are validation errors to allow you to save your work-in-progress until it is complete; however, Revisions with errors will not show as templates that can be used for Commission Profiles.
Viewing History
View and compare saved versions of a template.
To view a template’s history:
-
Click the History button.
The History For: pop-up window opens.
-
In the pop-up, click View on the version you want to view.
A pop-up with the version’s XML opens.
-
Click the View History button to return to the History For pop-up window.
To compare template versions:
-
Select the Compare radio box for any two versions to compare their XML.
-
Click Compare Selected
The pop-up shows the two versions side-by-side, where you can compare their differences.
To revert to a previous template version:
- Click View on the old version.
- Copy the XML from the pop-up.
- Close the History For: pop-up.
- Add a Template Revision.
- Paste the XML into the XML Editor.
- Save the template.
Deleting a Template or Revision
To delete a Template:
-
Select the Template Name with no Revisions.
If the template has Revisions, you must first delete the Revisions.
-
Click the Delete button.
A pop-up opens requesting confirmation.
-
In the pop-up, click Delete to confirm.
To delete a Revision:
-
Select the Template Name.
-
Select the Template Revision
-
Click the Delete button.
A pop-up opens requesting confirmation.
-
In the pop-up, click Delete to confirm.
Using the Helper Documentation
The sidebar documentation helper features descriptions and snippets for many XML elements used in compensation plans.
-
Expand a category.
-
Locate the element you want to view and click more.
The box expands, showing parameters.
-
Click Copy xml snippet.
The snippet copies to your clipboard.
-
In the XML Editor, paste the snippet.
A blank snippet with parameters pastes in the editor.
<IndexVolume IndexVolume="" />
You can find many of the same elements documented in the XML Reference.
Comments
Please sign in to leave a comment.