Setting up your system for the first time can seem like a daunting undertaking; however, it involves a series of simple tasks.
Configure Tree Types
Admin: Corporate Admin
Page: Settings > Advanced Settings > Configure Trees
URL: [CLIENTID].corpadmin.directscale.com/Settings/TreeConfiguration
Permission: ViewAdministration(), ViewAdvancedSettings()
| Do not change Tree settings after initialization. Contact Customer Care for any assistance. |
You can enable, disable, and customize the configurations of your Trees.
Enrollment Trees
-
Navigate to the Configure Trees page.
-
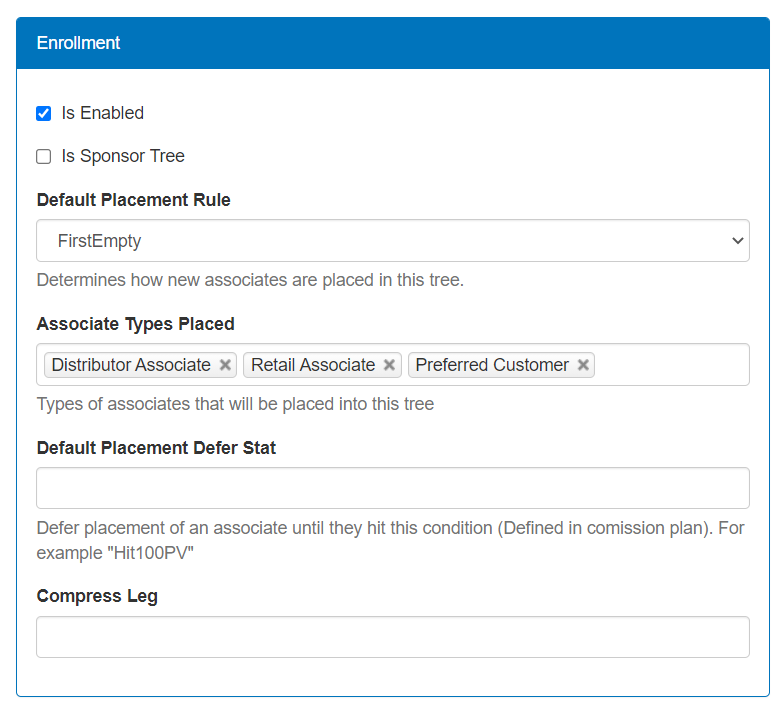
Locate the Enrollment section.
-
Configure the following settings to your preference:
-
Is Enabled — Enable the Tree.
-
Is Sponsor Tree — Set this Tree type to function as the Sponsor Tree. You can only select this setting for one of your enabled Trees at a time.
-
Default Placement Rule - Select an option that determines how the system places new Associates in this Tree. Options include:
-
DoNotPlace — Do not place the Associate in any Tree.
-
Defer — Only enroll an Associate once they’ve met a certain stat qualification. This setting works in conjunction with the Default Placement Defer Stat setting. If applicable:
-
Select Defer.
-
Enter the Rule’s Key from your compensation plan into the Default Placement Defer Stat field.
-
-
FirstEmpty — Place the Associate in the first available location.
-
FirstEmptyRollup — The system checks if it placed the Associate’s Enroller in the Tree. If not, it will enroll the Associate within the next open spot of the Enroller’s Sponsor.
-
Strong — The Associate places in the Leg with the most primary volume.
-
Weak — The Associate places in the Leg with the least primary volume.
-
Inside, Outside, Left, Right — Do not use. These options only work for Binary and Matrix Trees.
-
CollapseRetail — When a Retail Associate signs up under another Retail Associate, it tells the system not to keep the Tree hierarchy and will instead collapse them up.
-
UsePreference — Do not use. These options only work for Binary Trees.
-
-
Associate Types Placed — Select which Associate Types to place in this Tree.
-
Default Placement Defer Stat — You can have a Rule in your compensation plan with criteria that an Associate must meet before the system places them in this Tree. If applicable:
-
Enter the Rule’s Key from your compensation plan into this field.
-
Select Defer in the Default Placement Rule dropdown.
-
-
Compress Leg - Do not use. This field only works for Binary and Matrix Trees.
-
-
Click Save Changes.
Unilevel Trees
-
Navigate to the Configure Trees page.
-
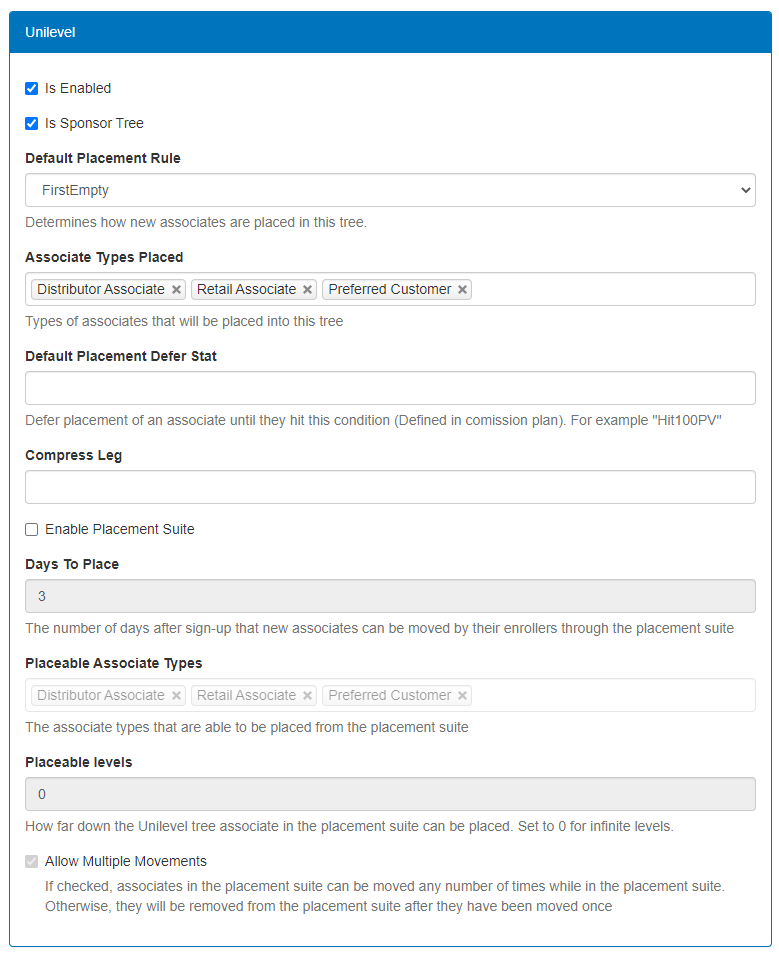
Locate the Unilevel section.
-
Configure the following settings to your preference:
-
Is Enabled — Enable the Tree.
-
Is Sponsor Tree — Set this Tree type to function as the Sponsor Tree. You can only select this setting for one of your enabled Trees at a time.
-
Default Placement Rule - Select an option that determines how the system places new Associates in this Tree. Options include:
-
DoNotPlace — Do not place the Associate in any Tree.
-
Defer — Only enroll an Associate once they’ve met a certain stat qualification. This setting works in conjunction with the Default Placement Defer Stat setting. If applicable:
-
Select Defer.
-
Enter the Rule’s Key from your compensation plan into the Default Placement Defer Stat field.
-
-
FirstEmpty — Place the Associate in the first available location.
-
FirstEmptyRollup — The system checks if it placed the Associate’s Enroller in the Tree. If not, it will enroll the Associate within the next open spot of the Enroller’s Sponsor.
-
Strong — The Associate places in the Leg with the most primary volume.
-
Weak — The Associate places in the Leg with the least primary volume.
-
Inside, Outside, Left, Right — Do not use. These options only work for Binary and Matrix Trees.
-
CollapseRetail — When a Retail Associate signs up under another Retail Associate, it tells the system not to keep the Tree hierarchy and will instead collapse them up.
-
UsePreference — Do not use. These options only work for Binary Trees.
-
-
Associate Types Placed — Select which Associate Types to place in this Tree.
-
Default Placement Defer Stat — You can have a Rule in your compensation plan with criteria that an Associate must meet before the system places them in this Tree. If applicable:
-
Enter the Rule’s Key from your compensation plan into this field.
-
Select Defer in the Default Placement Rule dropdown.
-
-
Compress Leg - Do not use. This field only works for Binary and Matrix Trees.
-
The rest of the settings pertain to the Web Office Placement Suite. Learn more in Setting up the Placement Suite.
-
-
Click Save Changes.
Binary Trees
-
Navigate to the Configure Trees page.
-
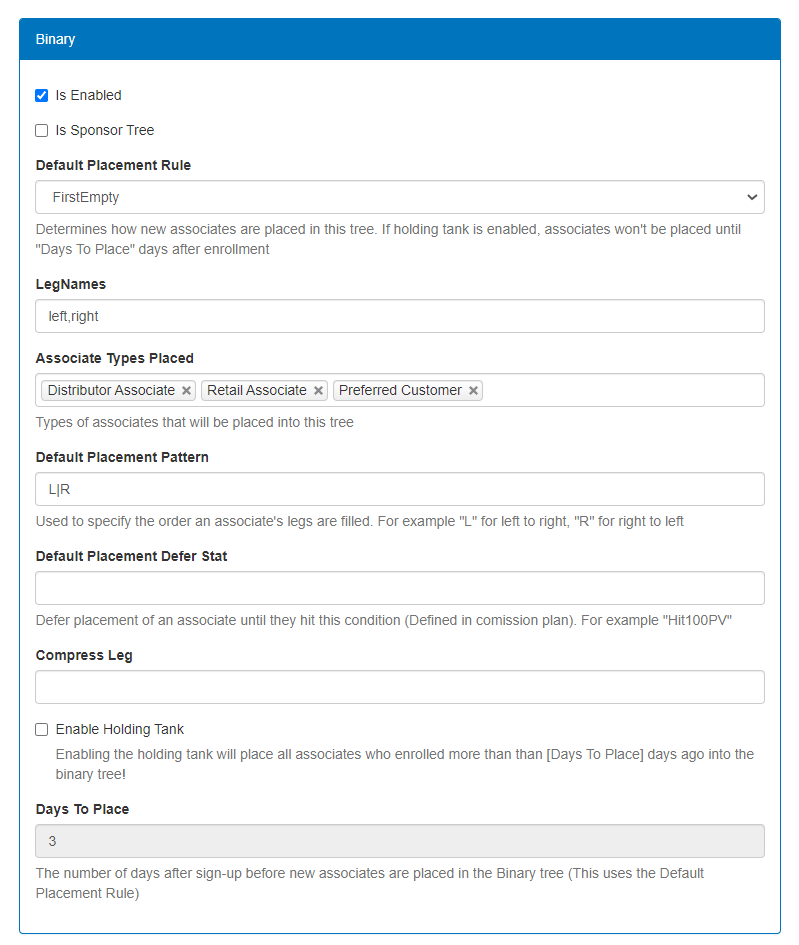
Locate the Binary section.
-
Configure the following settings to your preference:
-
Is Enabled — Enable the Tree.
-
Is Sponsor Tree — Set this Tree type to function as the Sponsor Tree. You can only select this setting for one of your enabled Trees at a time.
-
Default Placement Rule - Select an option that determines how the system places new Associates in this Tree. Options include:
-
DoNotPlace — Do not place the Associate in any Tree.
-
Defer — Only enroll an Associate once they’ve met a certain stat qualification. This setting works in conjunction with the Default Placement Defer Stat setting. If applicable:
-
Select Defer.
-
Enter the Rule’s Key from your compensation plan into the Default Placement Defer Stat field.
-
-
FirstEmpty — Place the Associate in the first available location.
-
FirstEmptyRollup — The system checks if it placed the Associate’s Enroller in the Tree. If not, it will enroll the Associate within the next open spot of the Enroller’s Sponsor.
-
Strong — The Associate places in the Leg with the most primary volume.
-
Weak — The Associate places in the Leg with the least primary volume.
-
Inside - The Associate places on the Inside Leg.
-
Outside - The Associate places on the Outside Leg.
-
Left - The Associate places on the Left Leg.
-
Right - The Associate places on the Right Leg.
-
CollapseRetail — When a Retail Associate signs up under another Retail Associate, it tells the system not to keep the Tree hierarchy and will instead collapse them up.
-
UsePreference — Allows Associates to determine their Tree rules by adding the Settings > Binary Placement Preferences widget to the Web Office using the Web Office Admin.
-
-
LegNames — Enter names for your Tree’s Legs. Separate the names with a comma and no spaces. For example,
Left,Middle,Right. The first entry always names the Left Leg. Additional names will continue to name the next Leg after. -
Associate Types Placed — Select which Associate Types to place in this Tree.
-
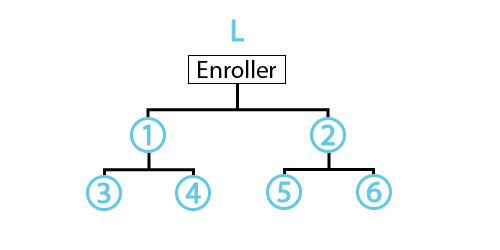
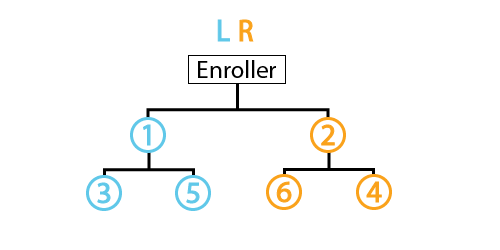
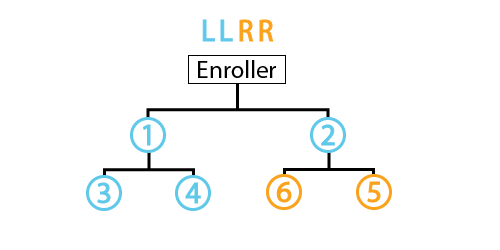
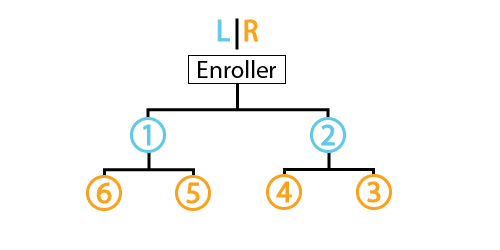
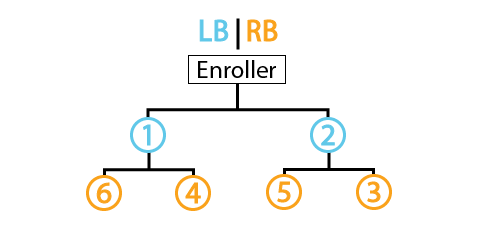
Default Placement Pattern — This field allows you to create a Tree placement pattern for newly enrolled Associates.
The entry options are:
-
L — Will add an Associate on the next open Left Leg in a Tree.
-
R — Will add an Associate on the next open Right Leg in a Tree.
-
B — This option is added at the end of a pattern sequence and will enroll new Associates to keep the number of Associates in each Leg equal.
-
| -– When this option is placed between two pattern sequences, it will alternate between the patterns at the start of a new generation. You can customize these to your preference and without limit. Some popular examples for placement patterns include:
-
-
Default Placement Defer Stat — You can have a Rule in your compensation plan with criteria that an Associate must meet before the system places them in this Tree. If applicable:
-
Enter the Rule’s Key from your compensation plan into this field.
-
Select Defer in the Default Placement Rule dropdown.
-
-
Compress Leg — When an Associate is deleted, the Leg name entered in this field is the one that will compress the Generations below to balance and fill in the blank place for the deleted Associate.
This feature is optional. If you choose to use the function, please contact Customer Care before configuring; improper configurations can cause issues with site functionality. -
Enable Holding Tank - Select this checkbox to enable the Web Office Holding Tank. The Holding Tank will place all Associates into the Binary Tree who enrolled more than the specified days ago. If applicable:
-
Enable the Enable Holding Tank checkbox.
-
Enter an amount in the Days To Place field.
-
-
Days To Place - Enter The number of days after sign-up before the system places new Associates in the Binary Tree. If applicable:
-
Select the applicable Default Placement Rule.
-
Enable the Enable Holding Tank checkbox.
-
Enter an amount in the Days To Place field.
-
-
-
Click Save Changes.
Matrix Trees
-
Navigate to the Configure Trees page.
-
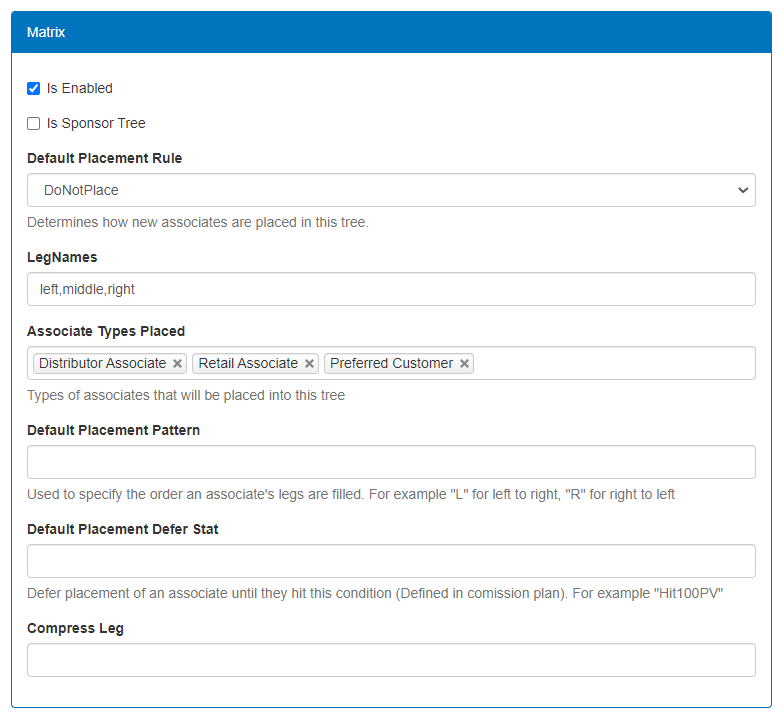
Locate the Matrix section.
-
Configure the following settings to your preference:
-
Is Enabled — Enable the Tree.
-
Is Sponsor Tree — Set this Tree type to function as the Sponsor Tree. You can only select this setting for one of your enabled Trees at a time.
-
Default Placement Rule - Select an option that determines how the system places new Associates in this Tree. Options include:
-
DoNotPlace — Do not place the Associate in any Tree.
-
Defer — Only enroll an Associate once they’ve met a certain stat qualification. This setting works in conjunction with the Default Placement Defer Stat setting. If applicable:
-
Select Defer.
-
Enter the Rule’s Key from your compensation plan into the Default Placement Defer Stat field.
-
-
FirstEmpty — Place the Associate in the first available location.
-
FirstEmptyRollup — The system checks if it placed the Associate’s Enroller in the Tree. If not, it will enroll the Associate within the next open spot of the Enroller’s Sponsor.
-
Strong — The Associate places in the Leg with the most primary volume.
-
Weak — The Associate places in the Leg with the least primary volume.
-
Inside - The Associate places on the Inside Leg.
-
Outside - The Associate places on the Outside Leg.
-
Left - The Associate places on the Left Leg.
-
Right - The Associate places on the Right Leg.
-
CollapseRetail — When a Retail Associate signs up under another Retail Associate, it tells the system not to keep the Tree hierarchy and will instead collapse them up.
-
UsePreference — Allows Associates to determine their Tree rules by adding the Settings > Binary Placement Preferences widget to the Web Office using the Web Office Admin.
-
-
LegNames — Enter names for your Tree’s Legs. Separate the names with a comma and no spaces. For example,
Left,Middle,Right. The first entry always names the Left Leg. Additional names will continue to name the next Leg after. -
Associate Types Placed — Select which Associate Types to place in this Tree.
-
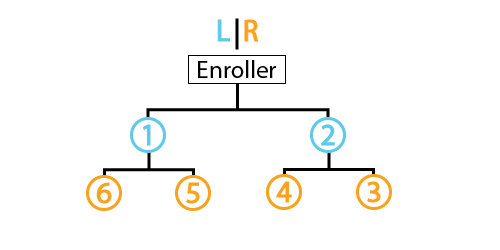
Default Placement Pattern — This field allows you to create a Tree placement pattern for newly enrolled Associates.
The entry options are:
-
L — Will add an Associate on the next open Left Leg in a Tree.
-
R — Will add an Associate on the next open Right Leg in a Tree.
-
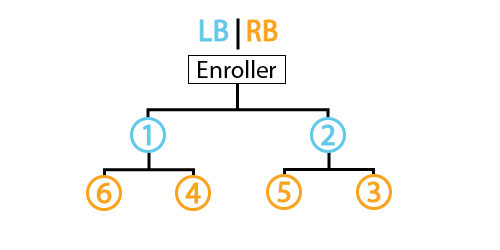
B — This option is added at the end of a pattern sequence and will enroll new Associates to keep the number of Associates in each Leg equal.
-
| -– When this option is placed between two pattern sequences, it will alternate between the patterns at the start of a new generation. You can customize these to your preference and without limit. Some popular examples for placement patterns include:


-
-
Default Placement Defer Stat — You can have a Rule in your compensation plan with criteria that an Associate must meet before the system places them in this Tree. If applicable:
-
Enter the Rule’s Key from your compensation plan into this field.
-
Select Defer in the Default Placement Rule dropdown.
-
-
Compress Leg — When an Associate is deleted, the Leg name entered in this field is the one that will compress the Generations below to balance and fill in the blank place for the deleted Associate.
This feature is optional. If you choose to use the function, please contact Customer Care before configuring; improper configurations can cause issues with site functionality.
-
-
Click Save Changes.
Add Additional Associate Types
Admin: Corporate Admin
Page: Tools > Developer Tools > Data Editor
URL: [CLIENTID].corpadmin.directscale.com/Corporate/Admin/SQLEditor
Permission: EditSqlEditorAdvanced()
Associate Types are numerical representations of an Associate’s purpose in your company. Being assigned a particular type allows them access to certain features, products, pricing, or commissions. You can manually add and delete Associate Types using the Data Editor.
By default, you have three Base Associate Types:
-
Distributor Associate - Customer who has signed up to sell for your company.
-
Retail Associate - Customer that shops in a Distributor Associate’s eCommerce Shop.
-
Preferred Customer - Customer that has signed up for an account to shop or an AutoShip.
For more information, see Base Associate Types, Associate Types, and Price Groups Explained.
To add a new Associate Type:
-
Search for the CRM_AssociateTypes table and find the Associate Types you’d like to edit.

-
Click the +New Row button.
-
Click each field to add text values to the columns.

The required fields are:
-
AssociateType: Enter the name of the new Associate Type.
-
Group: Enter 0 to make the Associate Type a visible option.
-
IsRetail:
-
Select the checkbox (True) if you want this Associate Type’s orders to be considered retail volume, which calculates differently in your compensation plan.
-
Unselect the checkbox (False) to disable.
-
-
BackOfficeSeed and BackOfficeFormat: These fields configure the Back Office ID for an Associate Type. Copy the text value displaying in the Base Associate Types or build your ID format.
-
TrackStartDate:
-
Select the checkbox (True) to track when an Associate becomes a particular Associate Type.
-
Unselect the checkbox (False) to disable.
-
For more information, see Enabling Associate Start Date Tracking.
-
-
Once complete, click
 to save.
| Suppose you want to make this Associate Type an option for new customers on the eCommerce Shop Enrollment page. In that case, you will need to create a custom Enrollment page and add the new option. |
Deleting Associate Types
-
Search for the CRM_AssociateTypes table and find the Associate Types you’d like to delete.
-
Click the checkbox to the left of the Record Number column.
-
Click the Delete Row(s) button.
-
Confirm by clicking OK in the pop-up.
Customize the Associate’s Back Office ID Format
Admin: Corporate Admin
Page: Settings > Advanced Settings > Associate Types
URL: [CLIENTID].corpadmin.directscale.com/Setting/AssociateTypes
Permission: ViewAdministration(), ViewAdvancedSettings()
A Back Office ID is your Associate’s unique identifier. It’s generated when you add an Associate to the system. You can customize the ID format in the Corporate Admin Advanced Settings.
You can customize the Back Office ID format for each Associate Type. For more information, see Adding Associate Types.
To edit an existing or default Associate Type:
-
Click the Edit button.
-
The Edit Associate Type pop-up window opens.
| If you need to edit these configurations, the pop-up will display the default settings. If you make any changes, IDs generated under the previous customizations will stay the same. |
Building Back Office Format
To customize the generated ID, you must configure the ID format.
-
Click the Build BackOffice Format button.
The Build Back Office format pop-up window opens.
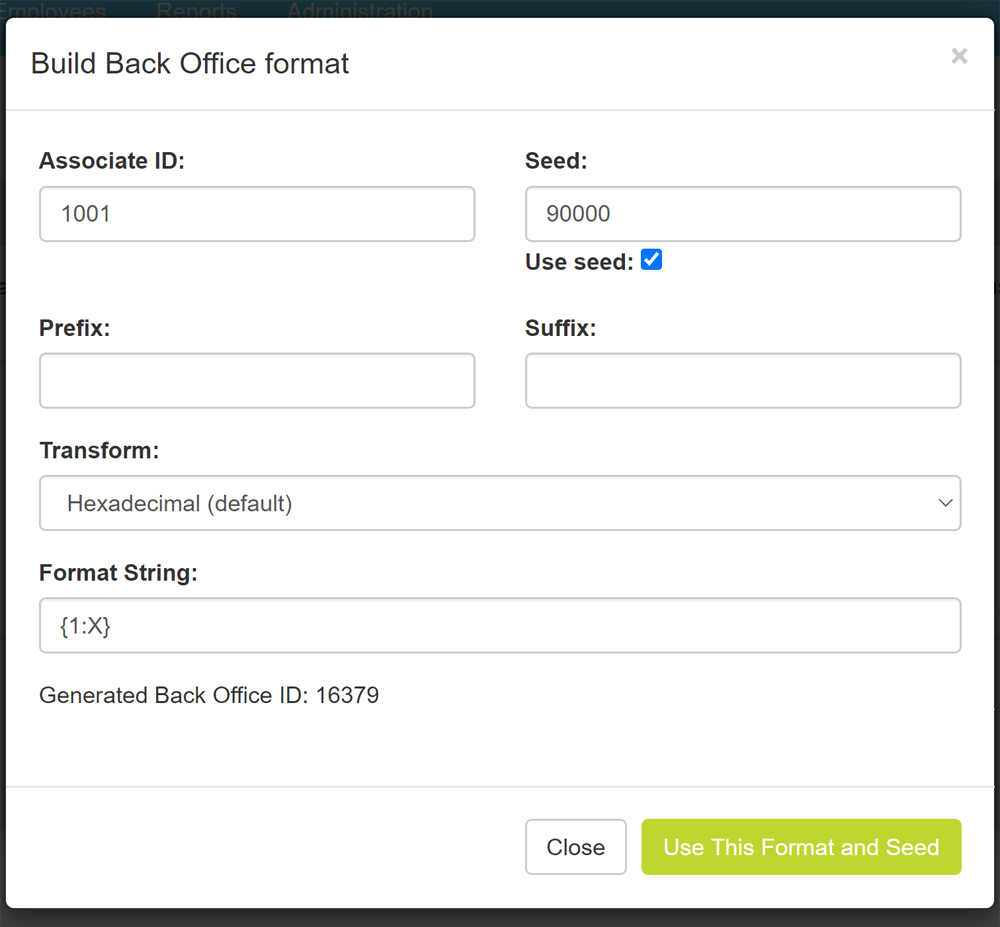
An example ID displays at the bottom of the pop-up.
Associate ID
Enter a number at which your Back Office IDs begin. By default, this field displays 1001.
Seed
-
Enter a number amount into the Seed field.
By default, this field displays 90000. This amount combines with the number in the Associate ID field. The Back Office ID generation uses this sum. Depending on your need, this allows you to create a small or large amount of Back Office IDs.
This field is optional. You can remove it from the process by de-selecting the Use seed checkbox.
(Optional) Prefix and Suffix
-
Enter a number or character to the Prefix or Suffix fields.
Whatever entered will always add to the front or back of the generated ID.
Transform
-
Select an option from the Transform dropdown.
With this option, you determine which Hexadecimal format (Base 16) to use. By default, with Hexadecimal, the ID can have a mixture of numbers (0-9) and letters (A-F).
Other options include:
-
None — Turns off Hexadecimal format. This selection generates an ID based on the previous settings (Associate ID, Seed, Prefix, and Suffix). The ID will be a sequential number based on the seed (Seed+1, Seed+2, etc.)
-
Hexadecimal 4+ digits — ID must have at least four digits.
-
Hexadecimal 8+ digits — ID must have at least eight digits.
-
Hexadecimal 16+ digits — Requires the Back Office ID have at least 16 digits.
If the ID amount is less than required, the system adds zeroes in front to make up for the missing digits.
-
Format String
In the Format String field, you have the default value {1:X}. This value is a C# Numeric Format String that takes the previous configurations (represented with 1) converts to Hexadecimal (X).
You can use other C# Standard Numeric Format Strings as well.
If you have the previous options configured to your preference, then you can skip this field.
Saving the Configuration
-
Click the Use this Format and Seed button to save the configuration.
In the Add Associate Type pop-up window, the Back Office Seed and Back Office Format update to your new format.
-
Click the Save button to save the Associate Type.
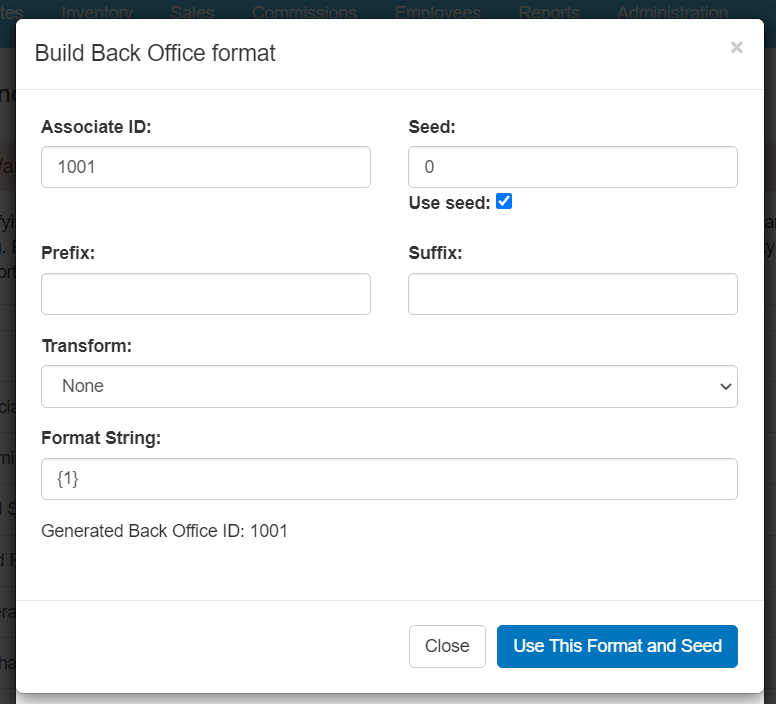
Matching Associate ID and Back Office ID
If you wanted the Back Office ID to match the DirectScale Associate ID number, use the following configurations:
-
Seed: 0
-
Transform: None
-
Format String: {1}
Customize Your Marketing Sites URL Format
Admin: Web Office Admin
Page: Advanced Settings > Information
URL: [CLIENTID].admin.directscale.com/#/Settings
Permission: Setup Information
Replicated sites are an excellent way for your Associates to market themselves and your product. If you have a replicated site, this section will show you how to enter the URL and customize the URL format regarding the inclusion of the webalias.
| The Information page displays auto-filled company details such as Company Name, Provider, and Client API ID. These details are read-only, and modification is not allowed without DirectScale or your DirectScale partner developer’s help. Send a request via chat or email to Customer Care for any updates to these details. |
The Replicated SiteUrl and Replicated SiteFormat fields are where you enter your replicated site’s URL and define the placement of the webalias, respectively.

To link your replicated site:
-
Enter your URL without the protocol (
http://www.) in the Replicated SiteURL field. -
Enter where the Associate’s username (webalias) will appear in the URL represented by
{webalias}the Replicated SiteURL Format field.For example,
{webalias}.directscale.comordirectscale.com/{webalias}. -
Click the SAVE REP SITE URLS button.
Comments
Please sign in to leave a comment.