If you want to handle your third-party logistics provider with an FTP solution, you can set up DirectScale’s FTP site.
Before You Start
-
You’ll need to set up your own SFTP site with a third-party service such as ExaVault.
-
Set up warehouses in both the Live and the Stage (if available) environments.
| FileZilla is useful in looking at the files/folders for troubleshooting. |
Folder Hierarchy
In your FTP app:
-
Choose SFTP.
-
Set up the folders inside of the server like so:
home folder (/)
│
└───To DirectScale
│   │
│   └───<Warehouse name>
│       │---<upload .csv/.xlsx files to sync here>
│       │
│       └───archive
│       │
│       └───error
│
└───From DirectScale
│   │
│   └───<Warehouse name>
│       │---<download .csv/.xlsx files to sync here>
-
The
<Warehouse name>will be the same name as the Warehouse you created in Corporate Admin. -
If you have multiple warehouses, you must add a folder for each to both
To DirectScaleandFrom DirectScaleparent folders, even if a warehouse will not be used. -
The
archiveanderrorfolders must be in the<Warehouse name>. -
You will download the synced .csv/.xlsx files from the
From DirectScale/<Warehouse name>folder. -
You will upload your .csv/.xlsx files to the
To DirectScale/<Warehouse name>folder.
Entering Credentials
Admin: Corporate Admin
Page: Settings > Advanced Settings > 3PL
URL: [CLIENTID].admin.directscale.com/#/Branding
Permission: ViewAdministration(), ViewAdvancedSettings()
| For testing purposes, add credentials to your Stage environment first (if available). |
After setting up an SFTP site folder hierarchy, enter your FTP provider’s credentials in Corporate Admin.
-
Scroll down to the FTP Site section.
-
Enter your credentials.

-
Username - FTP site username, is required to gain access.
-
Password - FTP site password, is required to gain access.
-
Port Number - SFTP connection port number. If left blank
22will be used. -
Host URL - FTP host URL. For example,
255.255.255.255orftp.hostdomain.com. -
Inbound Path - Enter the file path (minus any warehouse names) to where your 3PL will upload files. For example,
upload/inbound/directscale. -
Outbound Path - Enter the file path (minus any warehouse names) to where DirectScale will upload files. For example,
upload/outbound/directscale.If either Inbound Path or Outbound Path is left blank, the default paths To DirectScaleorFrom DirectScale, respectively, will be used.
-
-
For FTP to work on the Stage environment to test before making the configuration Live, select the Production Mode ? checkbox.
-
Click the Save Changes button.

Setting up Warehouses
Admin: Corporate Admin
Page: Settings > Inventory Settings > Warehouses
URL: [CLIENTID].corpadmin.directscale.com/Corporate/Inventory/Warehouse
Permission: ViewInventory(), *ViewWarehouses()
Connect your FTP site to a configured Warehouse.
To edit the warehouse:
-
Click the button on the Warehouse that will use FTP.

-
Select FtpSite from the Logistics Provider (3PL) dropdown.
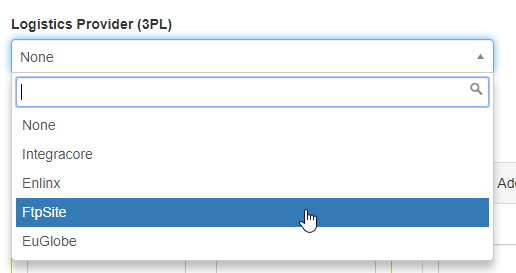
-
Click the Save Changes button.
|
The Warehouse Name and the folder name 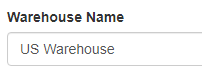 |
home folder (/)
│
└───To DirectScale
│   │
│   └───<Warehouse name>
│       │---<upload .csv files to sync here>
│       │
│       └───archive
│       │
│       └───error
│
└───From DirectScale
│   │
│   └───<Warehouse name>
│       │---<download .csv files to sync here>
Configuring Inventory Items to be Shippable
Admin: Corporate Admin
Page: Inventory > Products > Item Detail > Data
URL: [CLIENTID].corpadmin.directscale.com/Corporate/Inventory/ItemDetail?iid=[ITEM_ID]
Permission: ViewInventory()
For your inventory items to be "shippable", there are a couple of settings that must be set.
Under the Data tab, locate and set the following settings:
-
Requires Shipping - Select Yes.
-
Weight - Enter the shipping weight.
Downloading and Uploading Files to and from DirectScale
Every hour DirectScale will do a synchronization. This sync will take all submitted orders that haven’t been shipped yet and create a spreadsheet file that will be inside your SFTP site in:
└───From DirectScale
│   │
│   └───<Warehouse name>
Downloading and Editing the File
-
Navigate to your FTP folder (
From DirectScale > <Warehouse name>). -
In the
<Warehouse name>folder, locate the spreadsheet file that follows the following format:<warehouse name>yyyyMMdd.HHmm.xlsx. The file may also be a CSV file. -
Open the spreadsheet and compare the contents with the records displayed on the Shipments page.
Ensure the records on the spreadsheet contain correct data by:
-
Navigating to the specific order and reviewing the order’s Detail page.
-
Ensure the contents of the spreadsheet file only contain order packages with the statuses of "Submitted" or "Printed".
-
All of the line items in the new file should contain the correct data.
-
The header row should be bold and should have filters applied to it.
-
-
In the spreadsheet, edit several of the records by adding data to the DATESHIPPED, CARRIER, and TRACKINGNUMBER columns, and save the updated file to be uploaded to the FTP site.
Keep the DATESHIPPED format the same (i.e., "01/01/0001 00:00:00"). For example, for Jan 25, 2018, at 12:30 pm, you would change the date to "01/25/2018 12:30:00".
If you uploaded a given record with a DATESHIPPED, the package would also be marked "Shipped" after synchronization.
Columns Included in the File by Default
The following shows all of the default columns included in the file:
-
ORDERNUMBER
-
PACKAGEID
-
VENDORREFERENCE
-
DISTRIBUTERID
-
ORDERDATETME
-
SHIPMETHOD
-
SHIPNAME
-
SHIPADDRESS1
-
SHIPADDRESS2
-
SHIPCITY
-
SHIPSTATE
-
SHIPPOSTAL
-
SHIPCOUNTRY
-
SHIPPHONE
-
SHIPEMAIL
-
SHIPTOTALVALUE
-
WEIGHT
-
ORDERNOTES
-
SKU
-
QUANTITY
-
VALUE
-
CURRENCY
-
LINENOTES
-
DATESHIPPED
-
CARRIER
-
TRACKINGNUMBER
Uploading the File
Once you update the spreadsheet file, place it inside the folder on the SFTP site:
home folder (/)
│
└───To DirectScale
    │
    └───<Warehouse name>
Synchronizing the Shipment
Admin: Corporate Admin
Page: Inventory > Shipping
URL: [CLIENTID].corpadmin.directscale.com/Corporate/Inventory/Shipments
Permission: ViewShipping()
The sync that happens every hour will also check the folder above for any new spreadsheet files uploaded. Then the shipping status of the order will change in DirectScale’s database to "Shipped". Only files CSV and XLSX files are processed. Other file types are ignored.
If the update is successful, the provided carrier/tracking info will update. It will no longer show up in Inventory > Shipping within Corporate Admin.
Once a folder is processed, it will get copied to either the archive or error folder (depending on whether the process was successful or not) inside To DirectScale/<Warehouse name>.
home folder (/)
│
└───To DirectScale
│   │
│   └───<Warehouse name>
│       │---<upload .csv/.xlsx files to sync here>
│       │
│       └───archive
│       │
│       └───error
-
If an error occurs while attempting to download one of the above file types, the file in question moves to the
errorfolder. -
If successfully, the successfully-synced files show up in the
archivefolder.
To force the synchronization:
-
Click the Synchronize button on the Shipping page.

The Synchronize button will sync all warehouses regardless of which warehouse you currently have selected.
For more information, see Understanding Ship Synchronization.
Comments
Please sign in to leave a comment.